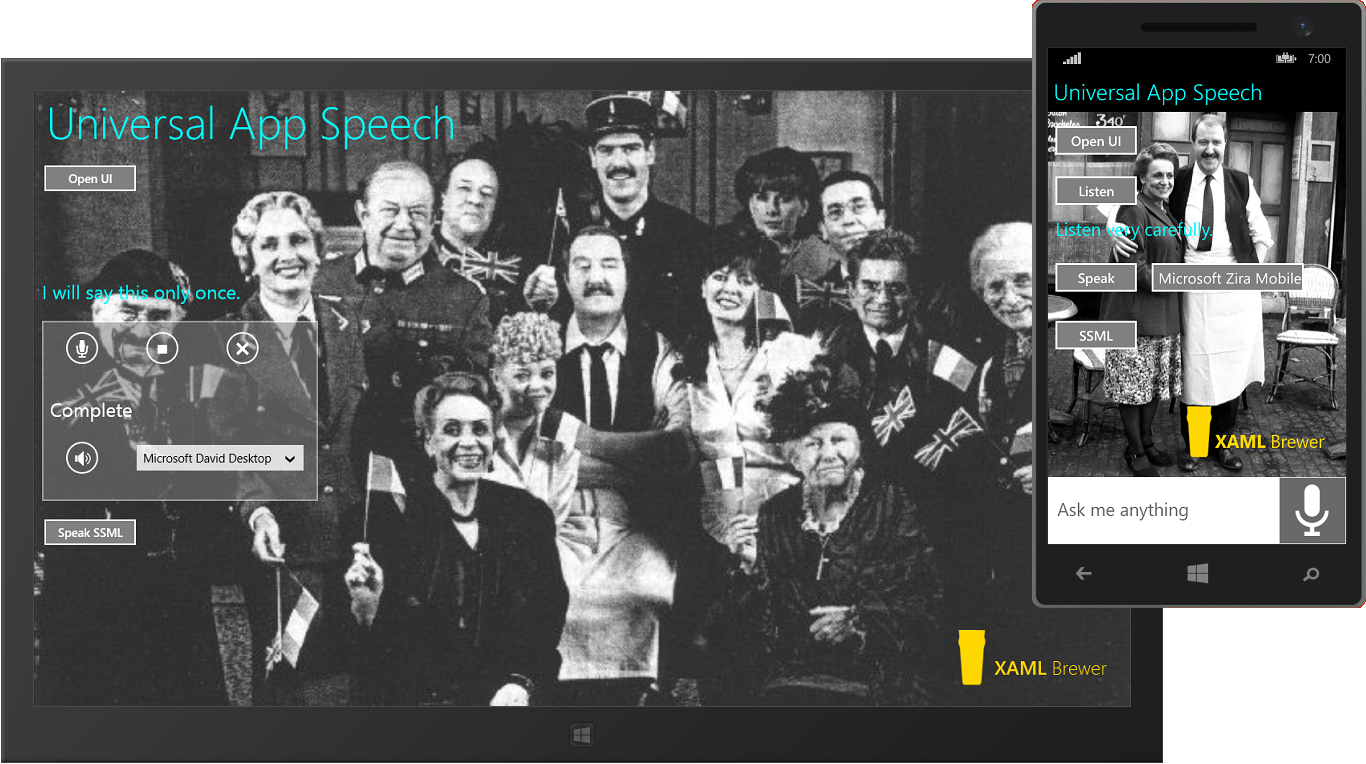
This article introduces you to speech recognition (speech-to-text, STT) and speech synthesis (text-to-speech, TTS) in a Universal Windows XAML app. It comes with a sample app – code attached at the end- that has buttons for
- opening the standard UI for speech recognition,
- opening a custom UI for speech recognition,
- speaking a text in a system-provided voice of your choice, and
- speaking a text from a SSML document.
On top of that, the Windows Phone version of the sample app comes with a custom control for speech and keyboard input, based on the Cortana look-and-feel.
Here are screenshots from the Windows and Phone versions of the sample app:
Speech Recognition
For speech recognition there’s a huge difference between a Universal Windows app and a Universal Windows Phone app: the latter has everything built in, the former requires some extra downloading, installation, and registration. But after that, the experience is more or less the same.
Windows Phone
For speech-to-text, Windows Phone comes with the SpeechRecognizer class, just create an instance of it: it will listen to you, think for a while, and then come up with a text string. You can make the recognition easier by giving the control some context in the form of Constraints, like
- a predefined or custom Grammar – words and phrases that the control understands, or
- a topic, or
- just a list of words.
Contradictory to the documentation, you *have* to provide constraints, and a call to CompileConstraintsAsync is mandatory.
You can trigger the default UI experience with RecognizeWithUIAsync. This opens the UI and starts waiting for you to speak. Eventually it returns the result as a SpeechRecognitionResult that holds the recognized text, together with extra information such as the confidence of the answer (as a level in an enumeration, and as a percentage). Here’s the full use case:
/// <summary>
/// Opens the speech recognizer UI.
/// </summary>
private async void OpenUI_Click(object sender, RoutedEventArgs e)
{
    SpeechRecognizer recognizer = new SpeechRecognizer();

    SpeechRecognitionTopicConstraint topicConstraint
            = new SpeechRecognitionTopicConstraint(SpeechRecognitionScenario.Dictation, "Development");

    recognizer.Constraints.Add(topicConstraint);
    await recognizer.CompileConstraintsAsync(); // Required

    // Open the UI.
    var results = await recognizer.RecognizeWithUIAsync();
    if (results.Confidence != SpeechRecognitionConfidence.Rejected)
    {
        this.Result.Text = results.Text;
        // No need to call 'Voice.Say'. The control speaks itself.
    }
    else
    {
        this.Result.Text = "Sorry, I did not get that.";
    }
}
This is how the default UI looks like. It takes the top half of the screen:
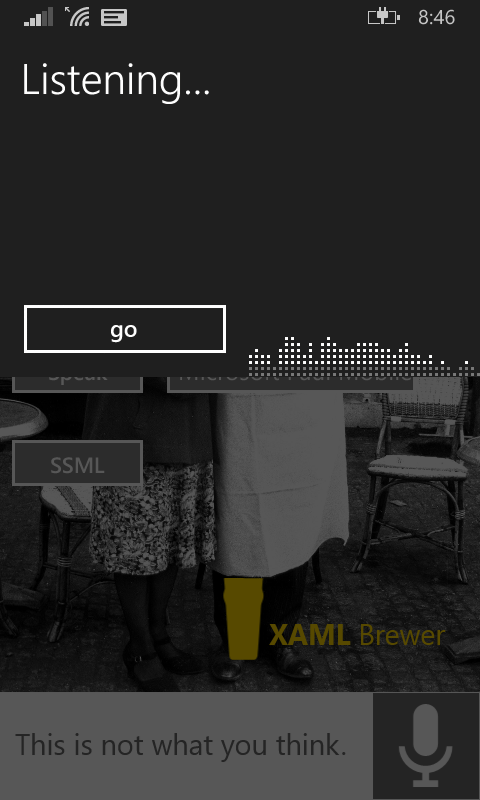
If you don’t like this UI, then you can start a speech recognition session using RecognizeAsync. The recognized text is revealed in the Completed event of the resulting IAsyncOperation. Here’s the whole UI-less story:
/// <summary>
/// Starts a speech recognition session.
/// </summary>
private async void Listen_Click(object sender, RoutedEventArgs e)
{
    this.Result.Text = "Listening...";

    SpeechRecognizer recognizer = new SpeechRecognizer();

    SpeechRecognitionTopicConstraint topicConstraint
            = new SpeechRecognitionTopicConstraint(SpeechRecognitionScenario.Dictation, "Development");

    recognizer.Constraints.Add(topicConstraint);
    await recognizer.CompileConstraintsAsync(); // Required

    var recognition = recognizer.RecognizeAsync();
    recognition.Completed += this.Recognition_Completed;
}

/// <summary>
/// Speech recognition completed.
/// </summary>
private async void Recognition_Completed(IAsyncOperation<SpeechRecognitionResult> asyncInfo, AsyncStatus asyncStatus)
{
    var results = asyncInfo.GetResults();

    if (results.Confidence != SpeechRecognitionConfidence.Rejected)
    {
        await Dispatcher.RunAsync(Windows.UI.Core.CoreDispatcherPriority.Normal, new DispatchedHandler(
            () => { this.Result.Text = results.Text; ; }));
     }
    else
    {
        this.Result.Text = "Sorry, I did not get that.";
    }
}
This was just an introduction, there’s a lot more in the Windows.Media.SpeechRecognition namespace.
Windows App
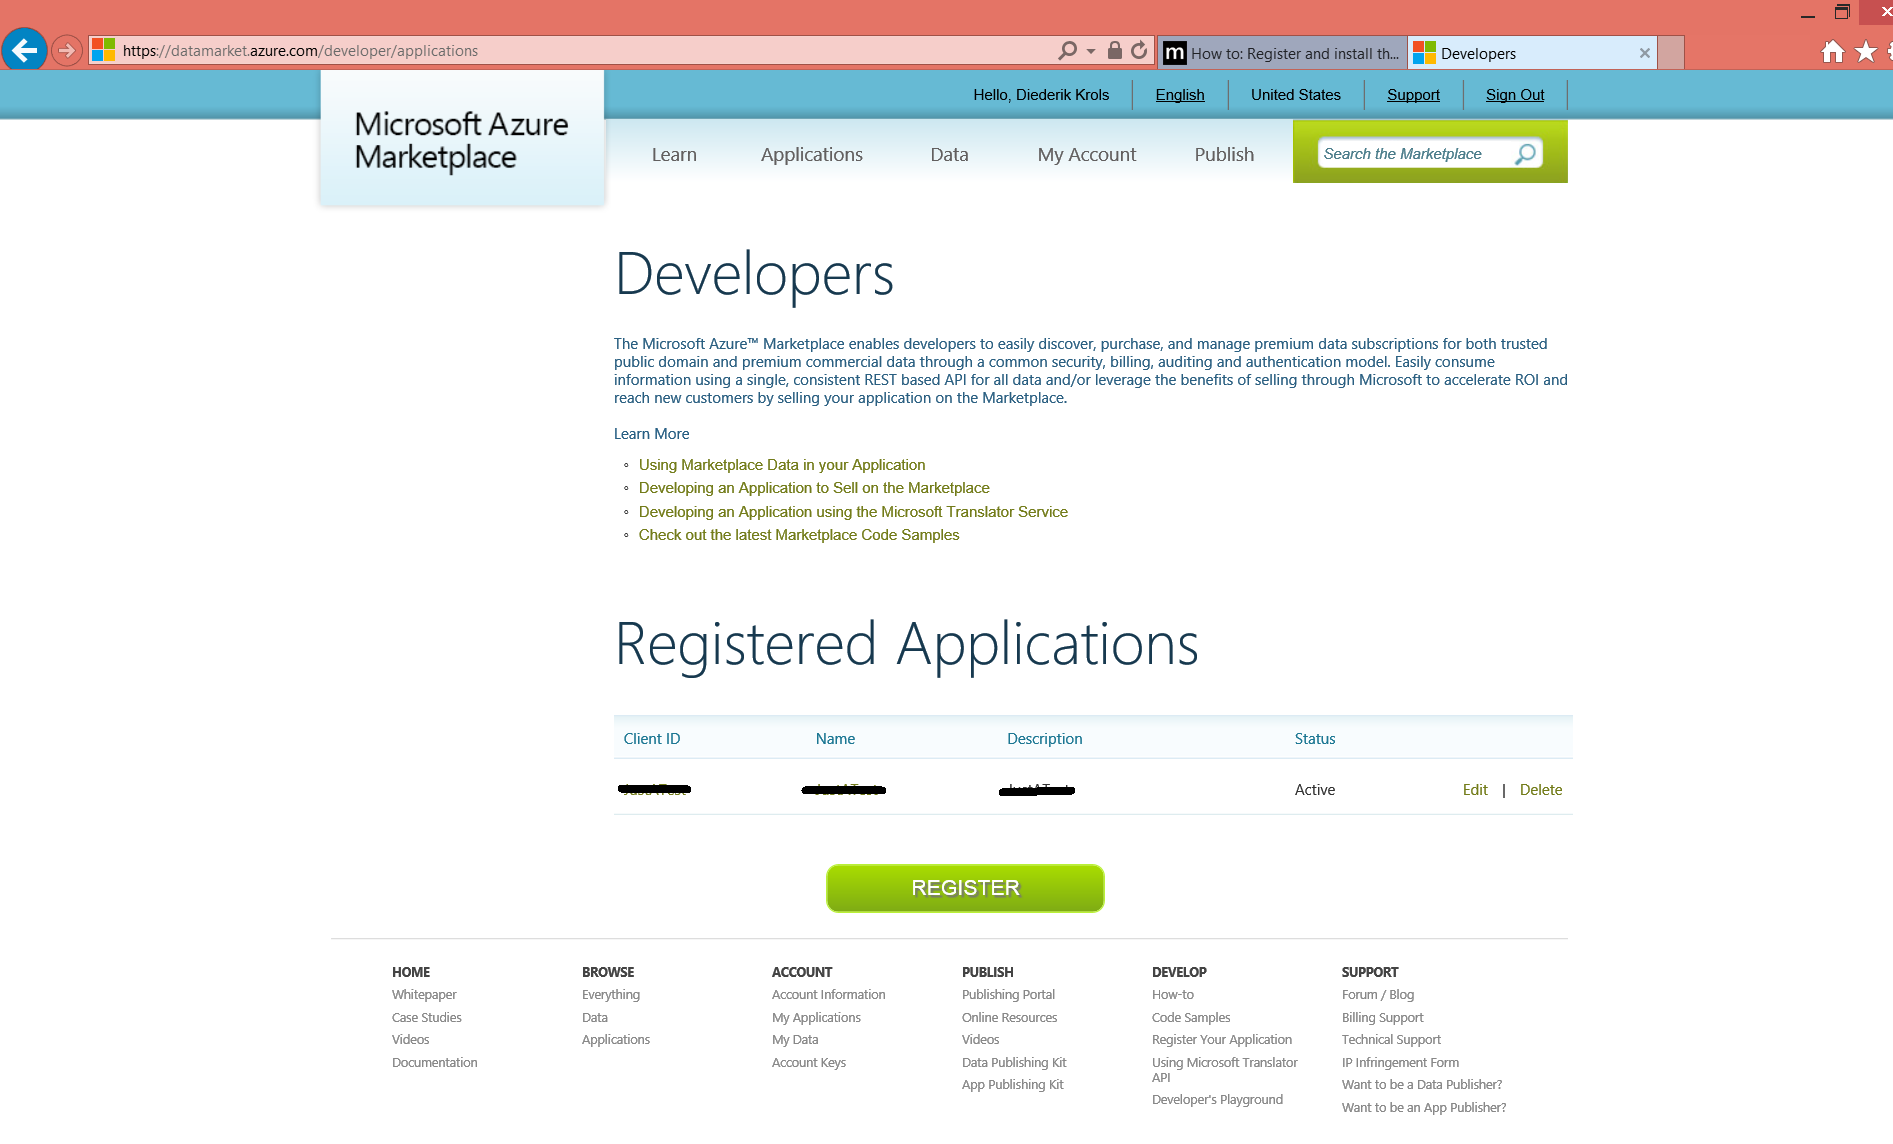
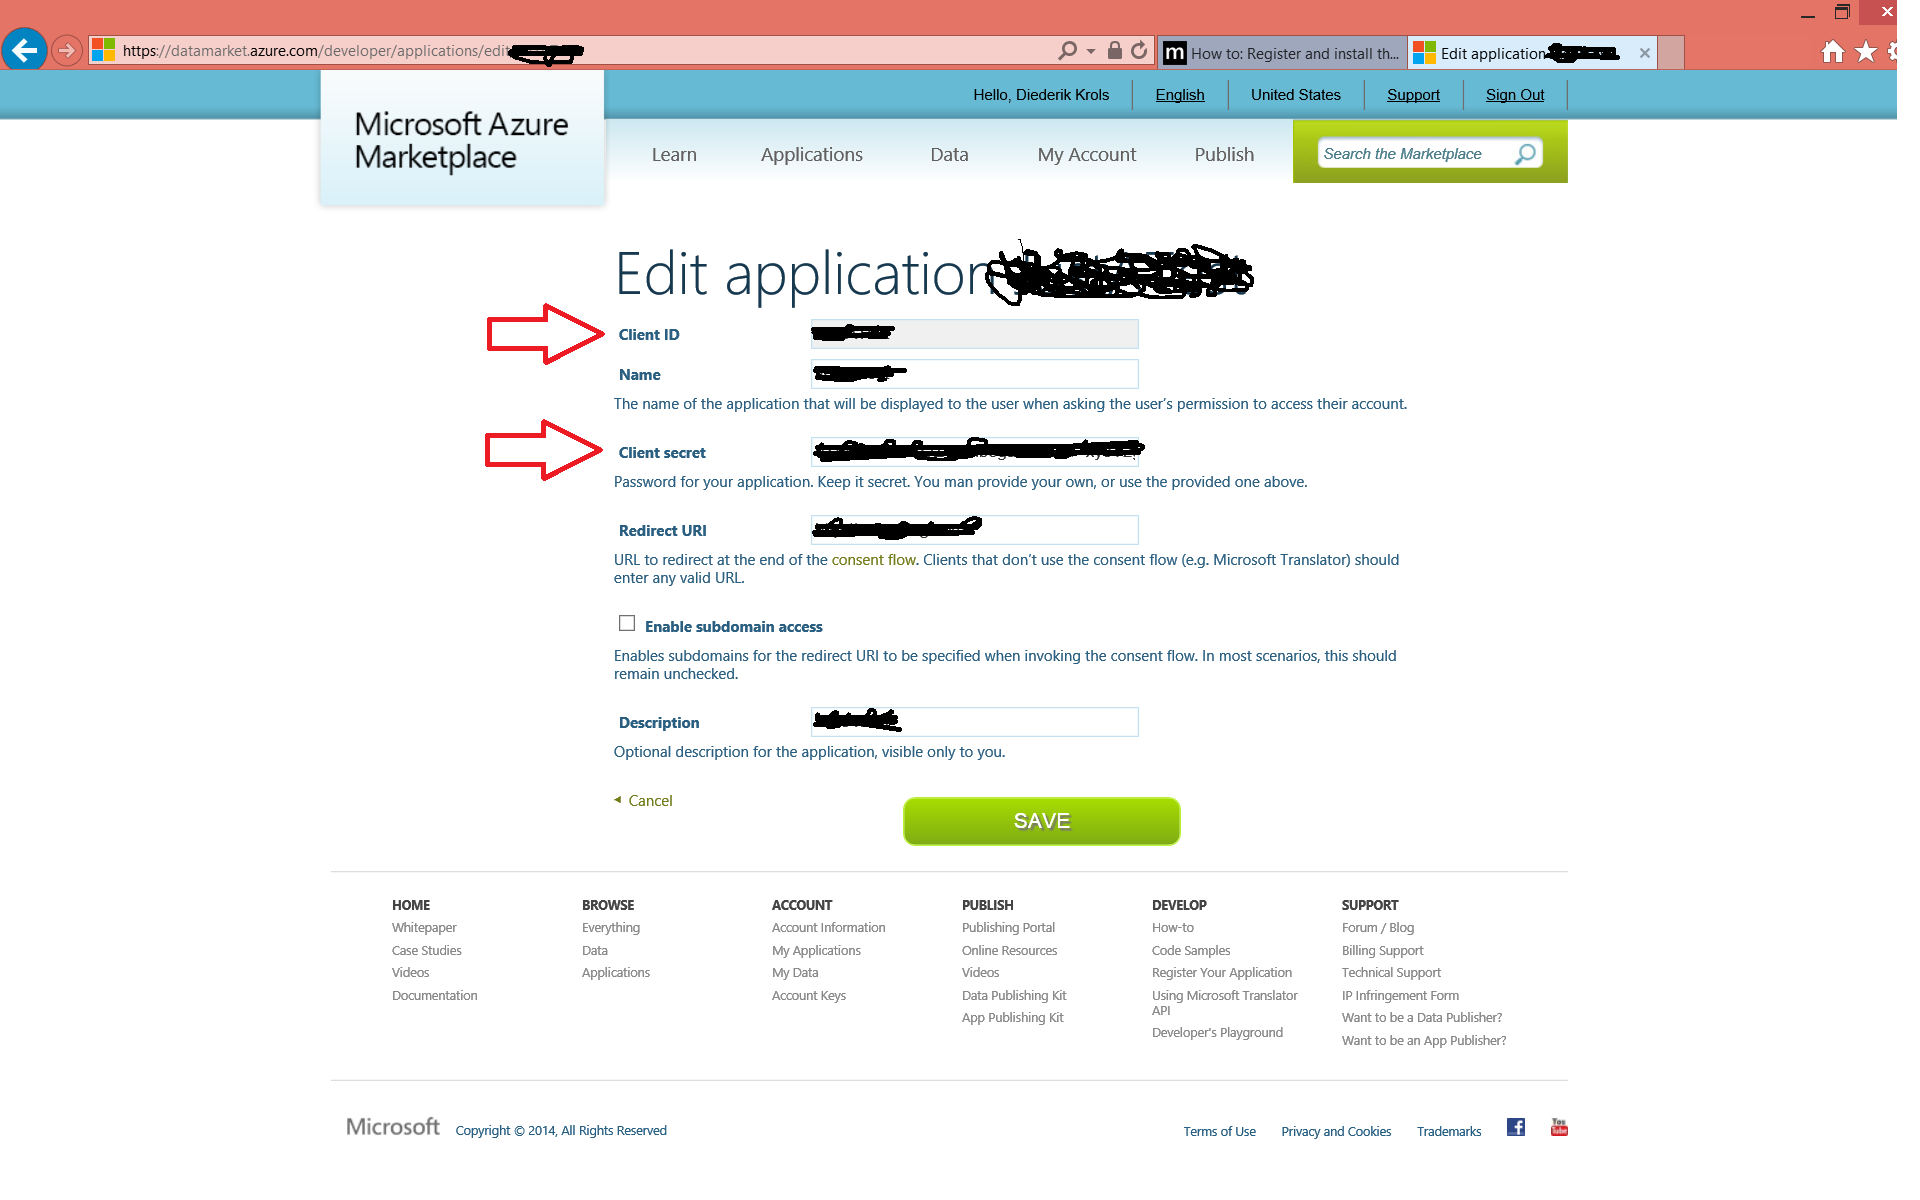
The SpeechRecognizer class is only native to Windows Phone apps. But don’t worry: if you download the Bing Speech Recognition Control for Windows 8.1, you get roughly the same experience. Before you can actually use the control, you need to register an application in the Azure Market Place to get the necessary credentials. Under the hood the control delegates the processing to a web service that relies on OAUTH. Here’s a screenshot of the application registration pages:
If you’re happy with the standard UI then you just drop the control on a page, like this:
<sp:SpeechRecognizerUx x:Name="SpeechControl" />
Before starting a speech recognition session, you have to provide your credentials:
var credentials = new SpeechAuthorizationParameters();
credentials.ClientId = "YourClientIdHere";
credentials.ClientSecret = "YourClientSecretHere";
this.SpeechControl.SpeechRecognizer = new SpeechRecognizer("en-US", credentials);
The rest of the story is similar to the Windows Phone code. Here’s how to open the standard UI:
/// <summary>
/// Activates the speech control.
/// </summary>
private async void OpenUI_Click(object sender, RoutedEventArgs e)
{
    // Always call RecognizeSpeechToTextAsync from inside
    // a try block because it calls a web service.
    try
    {
        var result = await this.SpeechControl.SpeechRecognizer.RecognizeSpeechToTextAsync();
        if (result.TextConfidence != SpeechRecognitionConfidence.Rejected)
        {
            ResultText.Text = result.Text;
            var voice = new Voice();
            voice.Say(result.Text);
        }
        else
        {
            ResultText.Text = "Sorry, I did not get that.";
        }
    }
    catch (Exception ex)
    {
        // Put error handling here.
    }
}
This is how the UI looks like. I put a a red box around it:
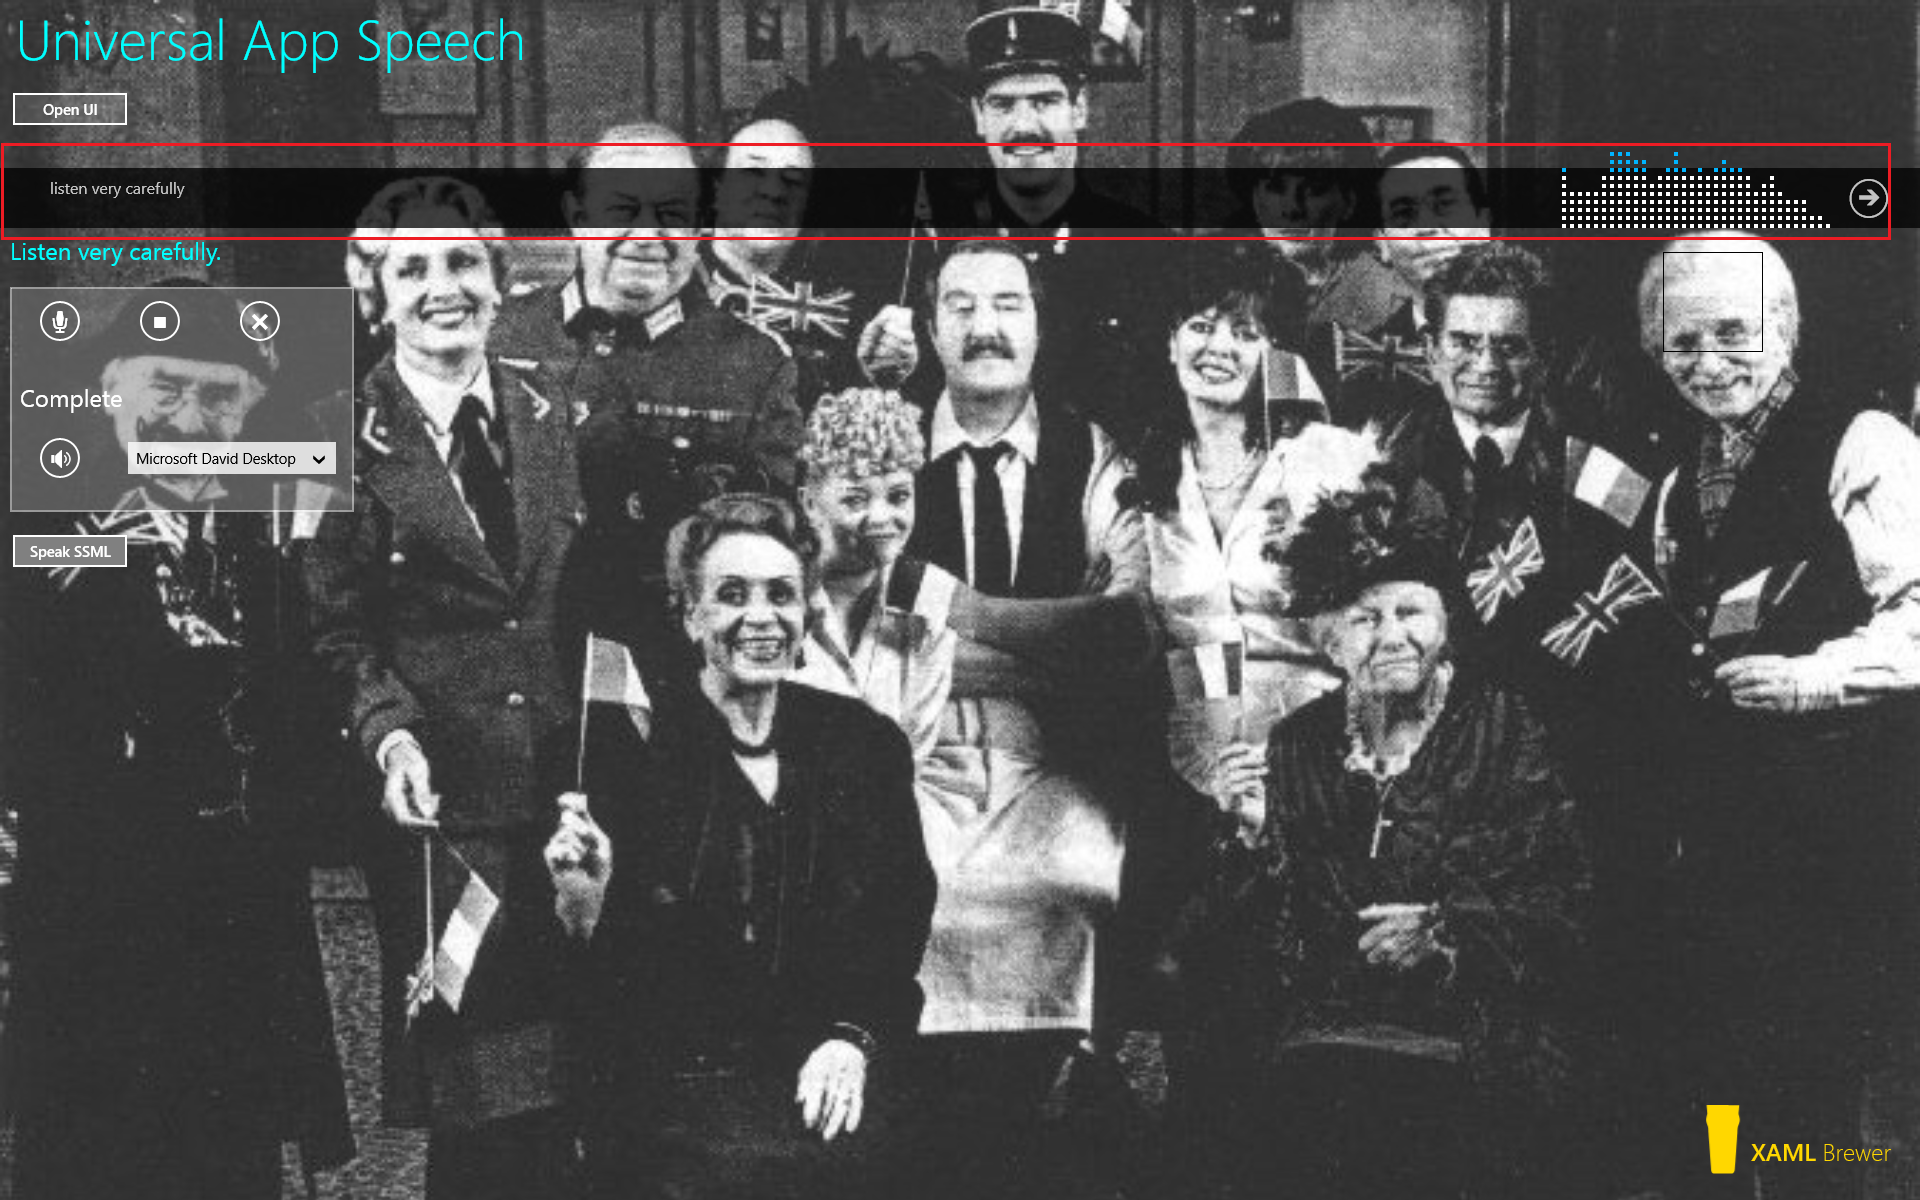
If you want to skip (or replace) the UI part, then you don’t need the control in your XAML (but mind that you still have to download and install it). Just prepare a SpeechRecognizer instance:
// The custom speech recognizer UI.
SR = new SpeechRecognizer("en-US", credentials);
SR.AudioCaptureStateChanged += SR_AudioCaptureStateChanged;
SR.RecognizerResultReceived += SR_RecognizerResultReceived;
And call RecognizeSpeechToTextAsync when you’re ready:
/// <summary>
/// Starts a speech recognition session through the custom UI.
/// </summary>
private async void ListenButton_Click(object sender, RoutedEventArgs e)
{
    // Always call RecognizeSpeechToTextAsync from inside
    // a try block because it calls a web service.
    try
    {
        // Start speech recognition.
        var result = await SR.RecognizeSpeechToTextAsync();

        // Write the result to the TextBlock.
        if (result.TextConfidence != SpeechRecognitionConfidence.Rejected)
        {
            ResultText.Text = result.Text;
        }
        else
        {
            ResultText.Text = "Sorry, I did not get that.";
        }
    }
    catch (Exception ex)
    {
        // If there's an exception, show the Type and Message.
        ResultText.Text = string.Format("{0}: {1}",
            ex.GetType().ToString(), ex.Message);
    }
}

/// <summary>
/// Cancels the current speech recognition session.
/// </summary>
private void CancelButton_Click(object sender, RoutedEventArgs e)
{
    SR.RequestCancelOperation();
}

/// <summary>
/// Stop listening and start thinking.
/// </summary>
private void StopButton_Click(object sender, RoutedEventArgs e)
{
    SR.StopListeningAndProcessAudio();
}

/// <summary>
/// Update the speech recognition audio capture state.
/// </summary>
private void SR_AudioCaptureStateChanged(SpeechRecognizer sender, SpeechRecognitionAudioCaptureStateChangedEventArgs args)
{
    this.Status.Text = args.State.ToString();
}

/// <summary>
/// A result was received. Whether or not it is intermediary depends on the capture state.
/// </summary>
private void SR_RecognizerResultReceived(SpeechRecognizer sender, SpeechRecognitionResultReceivedEventArgs args)
{
    if (args.Text != null)
    {
        this.ResultText.Text = args.Text;
    }
}
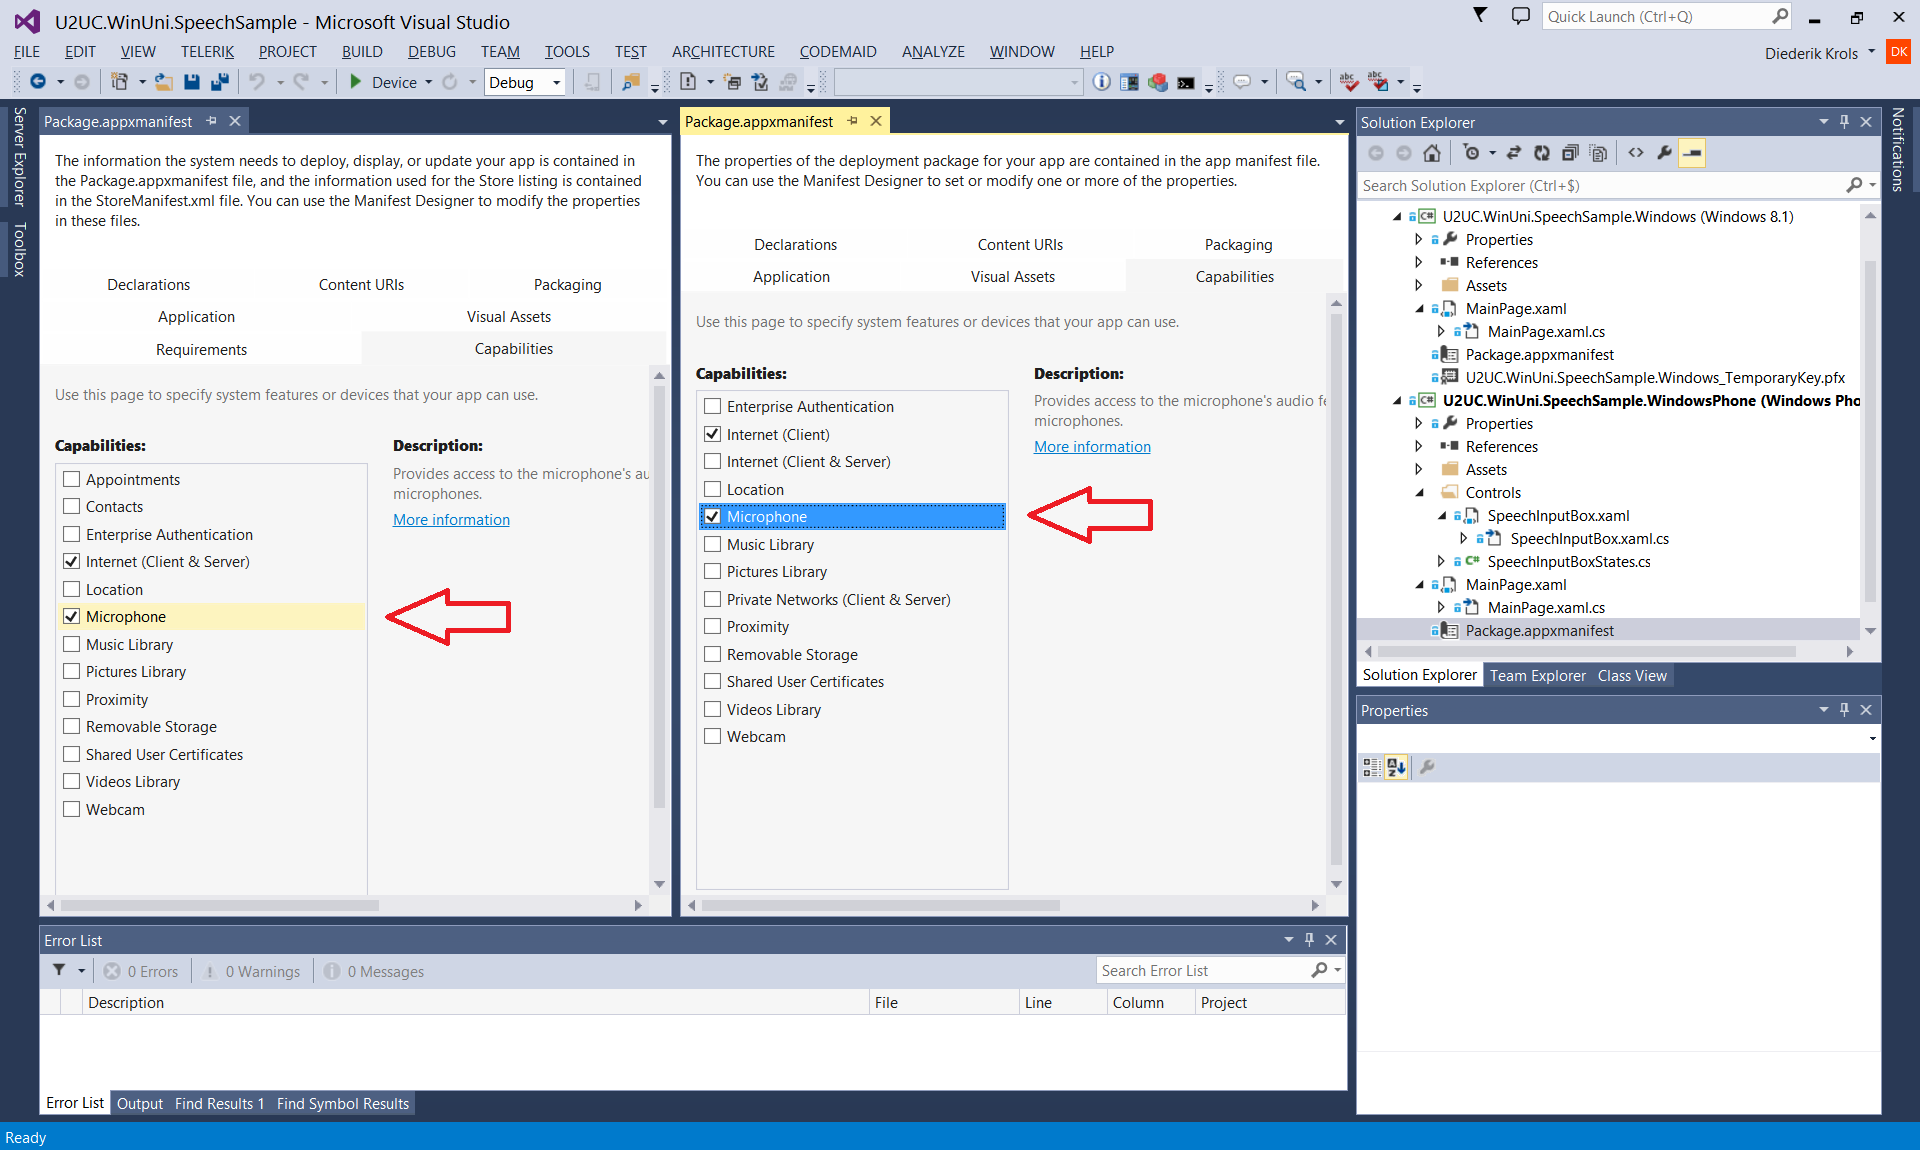
For Windows as well as Phone projects that require speech-to-text, don’t forget to enable the ‘Microphone’ capability. That also means that the user will have to give consent (only once):
Speech Synthesis
You now know how to let your device listen to you, it’s time to give it a voice. For speech synthesis (text-to-speech) both Phone and Windows apps have access to a Universal SpeechSynthesizer class. The SynthesizeTextToStreamAsync method transforms text into an audio stream (like a *.wav file). You can optionally provide the voice to be used; by selecting from the list of voices (SpeechSynthesizer.AllVoices) that are installed on the device. Each of these voices has it own gender and language. The voices depend on the device and your cultural settings: my laptop only speaks US and UK English, but my phone seems to be fluent in French and German too.
When the speech synthesizer's audio stream is complete, you can play it via a MediaElement on the page. Note that Silverlight 8.1 apps do not need a MediaElement, they can call the SpeakTextAsync method, which is not available for Universal apps.
Here’s the full flow. I wrapped it in a Voice class in the shared project (in an MVVM app this would be a 'Service'):
/// <summary>
/// Creates a text stream from a string.
/// </summary>
public void Say(string text, int voice = 0)
{
    var synthesizer = new SpeechSynthesizer();
    var voices = SpeechSynthesizer.AllVoices;
    synthesizer.Voice = voices[voice];

    var spokenStream = synthesizer.SynthesizeTextToStreamAsync(text);

    spokenStream.Completed += this.SpokenStreamCompleted;
}

/// <summary>
/// The spoken stream is ready.
/// </summary>
private async void SpokenStreamCompleted(IAsyncOperation<SpeechSynthesisStream> asyncInfo, AsyncStatus asyncStatus)
{
    var mediaElement = this.MediaElement;

    // Make sure to be on the UI Thread.
    var results = asyncInfo.GetResults();
    await mediaElement.Dispatcher.RunAsync(Windows.UI.Core.CoreDispatcherPriority.Normal, new DispatchedHandler(
        () => { mediaElement.SetSource(results, results.ContentType); }));
}
In a multi-page app, you must make sure that there is a MediaElement on each page. In the sample app, I reused a technique from a previous blog post. I created a custom template for the root Frame:
<Application.Resources>
    <!-- Injecting a media player on each page -->
    <Style x:Key="RootFrameStyle"
            TargetType="Frame">
        <Setter Property="Template">
            <Setter.Value>
                <ControlTemplate TargetType="Frame">
                    <Grid>
                        <!-- Voice -->
                        <MediaElement IsLooping="False" />
                        <ContentPresenter />
                    </Grid>
                </ControlTemplate>
            </Setter.Value>
        </Setter>
    </Style>
</Application.Resources>
And applied it in app.xaml.cs:
// Create a Frame to act as the navigation context and navigate to the first page
rootFrame = new Frame();

// Injecting media player on each page.
rootFrame.Style = this.Resources["RootFrameStyle"] as Style;

// Place the frame in the current Window
Window.Current.Content = rootFrame;
The voice class can now easily access the MediaElement from the current page:
public Voice()
{
    DependencyObject rootGrid = VisualTreeHelper.GetChild(Window.Current.Content, 0);
    this.mediaElement = (MediaElement)VisualTreeHelper.GetChild(rootGrid, 0) as MediaElement;
}

/// <summary>
/// Gets the MediaElement that was injected into the page.
/// </summary>
private MediaElement MediaElement
{
    get
    {
        return this.mediaElement;
    }
}
The speech synthesizer can also generate an audio stream from Speech Synthesis Markup Language (SSML). That’s an XML format in which you can not only write the text to be spoken, but also the pauses, the changes in pitch, language, or gender, and how to deal with dates, times, and numbers, and even detailed pronunciation through phonemes. Here’s the document from the sample app:
<?xml version="1.0" encoding="utf-8" ?>
<speak version='1.0'
       xmlns='http://www.w3.org/2001/10/synthesis'
       xml:lang='en-US'>
  Your reservation for <say-as interpret-as="cardinal"> 2 </say-as> rooms on the <say-as interpret-as="ordinal"> 4th </say-as> floor of the hotel on <say-as interpret-as="date" format="mdy"> 3/21/2012 </say-as>, with early arrival at <say-as interpret-as="time" format="hms12"> 12:35pm </say-as> has been confirmed. Please call <say-as interpret-as="telephone" format="1"> (888) 555-1212 </say-as> with any questions.

  <voice gender='male'>
    <prosody pitch='x-high'> This is extra high pitch. </prosody >
    <prosody rate='slow'> This is the slow speaking rate. </prosody>
  </voice>
  <voice gender='female'>
    <s>Today we preview the latest romantic music from Blablabla.</s>
  </voice>

  This is an example of how to speak the word <phoneme alphabet='x-microsoft-ups' ph='S1 W AA T . CH AX . M AX . S2 K AA L . IH T'> whatchamacallit </phoneme>.

  <voice gender='male'>
    For English, press 1.
  </voice>

  <!-- Language switch:  does not work if you do not have a french voice. -->
  <voice gender='female' xml:lang='fr-FR'>
    Pour le français, appuyez sur 2
  </voice>

</speak>
Here’s how to generate the audio stream from it:
/// <summary>
/// Creates a text stream from an SSML string.
/// </summary>
public void SaySSML(string text, int voice = 0)
{
    var synthesizer = new SpeechSynthesizer();
    var voices = SpeechSynthesizer.AllVoices;
    synthesizer.Voice = voices[voice];

    var spokenStream = synthesizer.SynthesizeSsmlToStreamAsync(text);

    spokenStream.Completed += this.SpokenStreamCompleted;
}
Speech Recognition User Control
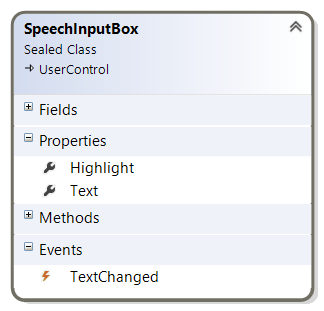
The Windows Phone project in the sample app contains a SpeechInputBox. It’s a user control for speech input through voice or keyboard that is inspired by the Cortana look-and-feel. It comes with dependency properties for the text and a highlight color, and it raises an event when the input is processed:
The control behaves like the Cortana one:
- it starts listening when you tap on the microphone icon,
- it opens the onscreen keyboard if you tap on the text box,
- it notifies you when it listens to voice input,
- the arrow button puts the control in thinking mode, and
- the control says the result out loud when the input came from voice (not from typed input).
The implementation is very straightforward: depending on the state the control shows some UI elements, and calls the API’s that were already discussed in this article. There’s definitely room for improvement: you could add styling, animations, sound effects, and localization.
Here’s how to use the control in a XAML page. I did not use data binding in the sample, the main page hooked an event handler to TextChanged:
<Controls:SpeechInputBox x:Name="SpeechInputBox" Highlight="Cyan" />
Here are some screenshot of the SpeechInputBox in action, next to its Cortana inspiration:
If you intend to build a Silverlight 8.1 version of this control, you might want to start from the code in the MSDN Voice Search for Windows Phone 8.1 sample (there are quite some differences with Universal apps: in the XAML as well as in the API calls). If you want to roll your own UI, make sure you follow the Speech Design Guidelines.
Code
Here’s the code, it was written in Visual Studio 2013 Update 3. Remember that you need to register an app to get the necessary credentials to run the Bing Speech Recognition control: U2UC.WinUni.SpeechSample.zip (661.3KB).
Enjoy!
XAML Brewer