At U2U we are currently very busy with creating 'Office Business Applications', an example of such an OBA application is the U2U Email Snippets, and I can already tell you that another great tool is coming up :-), so definitely stay tuned.
Sometimes when you create these office add-ins you meet some challenges or problems. In this article I want to give a brief explanation how you can share a Ribbon tab, so that you can create two buttons in the same ribbon and even in the same group on a tab.
This is also explained on the MS site but, they do it in three pages :-), I'm going to do it in a few lines :-) and some screens off course.
In this article I assume that you know how to create a Ribbon and with the Visual Studio Tools for Office 2007 it isn't that hard to do. So I've created 2 new projects and I've picked the 'Word Add-in' template.
When you create a project based on this template you got the files that you need to make an Outlook Add-in. I'm going to add a RibbonSupport Class to the project:
Go to the Codebehind of your ribbon, uncomment the partial class and run your program:
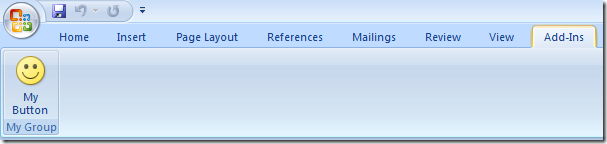
So the purpose of this article is to have multiple buttons in one tab. The key to success lies in namespaces: We are going to use the same or a shared namespace for the add-in. This is the Ribbon XML at this moment, not shared:
<customUI xmlns="http://schemas.microsoft.com/office/2006/01/customui" onLoad="OnLoad">
<ribbon>
<tabs>
<tab idMso="TabAddIns">
<group id="MyGroup"
label="My Group">
<toggleButton id="toggleButton1"
size="large"
label="My Button"
screentip="My Button Screentip"
onAction="OnToggleButton1"
imageMso="HappyFace" />
</group>
</tab>
</tabs>
</ribbon>
</customUI>
This is with a shared namespace added in the customUI.:
<customUI xmlns="http://schemas.microsoft.com/office/2006/01/customui"
xmlns:shared="http://www.u2u.info/blogs/kevin"
onLoad="OnLoad">
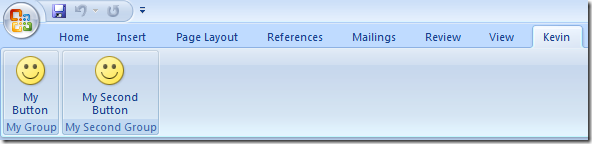
And then we are going to use this namespace in ribbon of the two add-ins:
First add-in:
<customUI xmlns="http://schemas.microsoft.com/office/2006/01/customui"
xmlns:shared="http://www.u2u.info/blogs/kevin"
onLoad="OnLoad">
<ribbon>
<tabs>
<tab idQ="shared:MyCustomTab" label="Kevin">
<group id="MyGroup"
label="My Group">
<toggleButton id="toggleButton1"
size="large"
label="My Button"
screentip="My Button Screentip"
onAction="OnToggleButton1"
imageMso="HappyFace" />
</group>
</tab>
</tabs>
</ribbon>
</customUI>
Second add-in:
<customUI xmlns="http://schemas.microsoft.com/office/2006/01/customui"
xmlns:shared="http://www.u2u.info/blogs/kevin"
onLoad="OnLoad">
<ribbon>
<tabs>
<tab idQ="shared:MyCustomTab" label="Kevin">
<group id="MyGroup"
label="My Second Group">
<toggleButton id="toggleButton1"
size="large"
label="My Second Button"
screentip="My Button Screentip"
onAction="OnToggleButton1"
imageMso="HappyFace" />
</group>
</tab>
</tabs>
</ribbon>
</customUI>
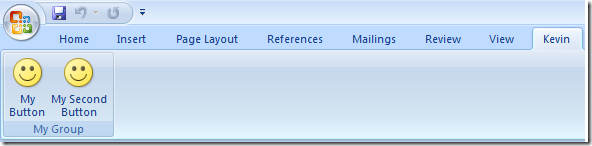
IdQ Stands for Qualified ID, and this is the id that we are sharing across the multiple ribbons.This will result in:
Off course you can go a step further and share the same group:
<group idQ="shared:MyGroup" label="My Group">
So, I hope this one helps you as it helped me :-)
K.