In this blog post I want to show my way of implementing the Model-View-ViewModel pattern for WPF. I hope it serves as a simple example for those of you who want to start using it.
The advantage of MVVM is that the view, which is a WPF thing, doesn’t contain any code. Instead the view uses a lot of data binding to bind itself to the data, but also to the functionality through commands. Because the model itself should not be dependent on any specific technology, we use a viewmodel, which is an adapter, to add the model things like extra data and commands. So again, the view doesn’t contain any code, the viewmodel does. This means that it is possible to download the view from a database, so you can vary the view per company/user, or make it very easy to update the view. Second advantage is that is makes it very easy to test your functionality using unit tests, which I think is the most important advantage…
Use INotifyPropertyChanged
So let’s get started. First of all you should understand INotifyPropertyChanged.
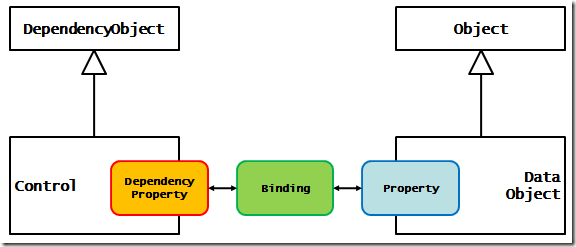
To better understand the importance of INotifyPropertyChanged, you should understand how databinding works, for example in WPF.

In WPF any control can data bind any of its dependency properties to any data through its data binding mechanism. The control doesn’t need to know about the data object (actually it can’t know the type of the data object because the control is usually written several years before the data object :)

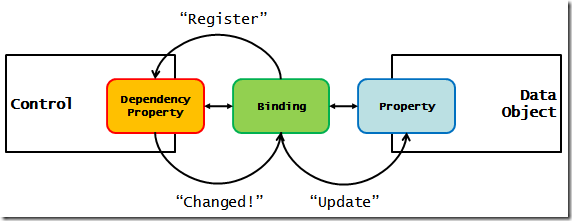
Dependency properties have this special feature, namely that you can register for the changed event of the dependency property. So when someone changes the control’s property, the databinding object will be notified and it can then update the data object’s property.

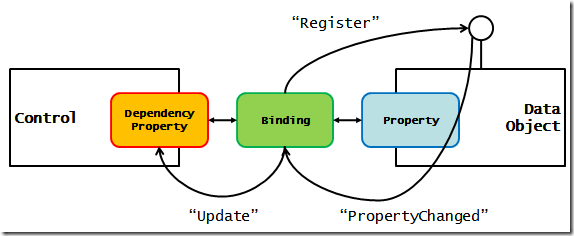
INotifyPropertyChanged does the same thing. A databinding object from WPF knows about this interface and will query the data object for it. When it has this interface, the databinding object registers itself for any changed events, and updates the control’s property. This way you get two-way data binding, when one side changes, the other side gets updated as well. Likewise should you use ObservableCollection<T> for any collections, so these can notify any controls that the list has changed.
Implementing INotifyPropertyChanged is simple. Start by defining a base class that implements the interface:
1: public class Entity : INotifyPropertyChanged
2: {
3: public event PropertyChangedEventHandler PropertyChanged;
4:
5: public virtual void RaisePropertyChanged(string propName)
6: {
7: if (PropertyChanged != null)
8: PropertyChanged(this, new PropertyChangedEventArgs(propName));
9: }
10: }
INotifyPropertyChanged requires you to implement the PropertyChanged event, and trigger it each time a property changes. This base class does it all… Then any object requiring it can derive from this base class; both model and viewmodel should derive and raise the PropertyChanged event when they change. In this example I’m going to use a Person class:
1: public class Person : Entity
2: {
3: public class Properties
4: {
5: public const string Name = "Name";
6: public const string Age = "Age";
7: }
8:
9: private string name;
10:
11: public string Name
12: {
13: get { return name; }
14: set
15: {
16: if (name != value)
17: {
18: name = value;
19: RaisePropertyChanged(Person.Properties.Name);
20: }
21: }
22: }
23:
24: private int age;
25:
26: public int Age {
27: get { return age; }
28: set {
29: if (age != value) {
30: age = value;
31: RaisePropertyChanged(Person.Properties.Age);
32: }
33: }
34: }
35: }
There has been much discussion going on on how to implement the setter of your property, mainly in how to pass the property name to the event. I like to use a nested “Properties” class that contains a const string for each property name. This way I find it easy to refactor my property since there are no more strings. Other people like to use reflection but I hate the runtime overhead this brings. This technique also makes is easier to register for PropertyChanged events from other objects. If each class has a nested Properties class, you can easily code find the name of each property using intelli-sense.
The Model.
Your model should be exactly that. The representation of your business data, such as lists of things. In my example the model is very simple; it contains a list of Person objects. In real life these would the several lists of interrelated objects, such as products, customers, their orders, etc… The model can also have methods implementing business functionality. Any changes to the model should trigger events notifying any controls of changes…
1: public class PeopleModel /* : Entity */
2: {
3: private ObservableCollection<Person> people
4: = new ObservableCollection<Person>()
5: { // Let's add some data to make it easier to verify data binding in view
6: new Person { Name = "Wesley", Age = 31 },
7: new Person { Name = "Dimitri", Age = 28 },
8: new Person { Name = "Gert", Age = 24 },
9: new Person { Name = "Peter", Age = 24 }
10: };
11:
12: public ObservableCollection<Person> People
13: {
14: get { return people; }
15: }
16:
17: /* and many more other collections and objects */
18: }
Please note that normally the model would also implement INotifyPropertyChanged, but because this model doesn’t need it, I haven’t gone to the trouble… Uncommenting the Entity base class will not change any functionality in this example so if you want, go right ahead!
The ViewModel
For me the ViewModel is an adapter, that only exposes stuff so the view can only access what is necessary. For example the view will contain a list of people, will have a current selected person and two fields so you can create a new person. The ViewModel will use data binding to couple itself to the view, but doesn’t know any specific things about the controls used. It does however implement INotifyPropertyChanged so changes to the ViewModel will update the view:
1: public class PersonVM : Entity
2: {
3: private PeopleModel model;
4:
5: public PersonVM(PeopleModel m) { model = m; }
6:
7: public ObservableCollection<Person> People
8: {
9: get { return model.People; }
10: }
11:
12: private string name;
13: public string Name
14: {
15: get { return name; }
16: set
17: {
18: if (name != value)
19: { name = value; RaisePropertyChanged("Name"); }
20: }
21: }
22:
23: private int age;
24: public int Age
25: {
26: get { return age; }
27: set
28: {
29: if (age != value)
30: { age = value; RaisePropertyChanged("Age"); }
31: }
32: }
33:
34: private Person current;
35:
36: public Person Current
37: {
38: get { return current; }
39: set
40: {
41: if (current != value)
42: {
43: current = value;
44: RaisePropertyChanged("Current");
45: }
46: }
47: }
48:
49: public void DeleteCurrentPerson()
50: {
51: model.People.Remove(Current);
52: Current = model.People[0];
53: }
54:
55: public ICommand DeleteCommand
56: {
57: get { return new RelayCommand(DeleteCurrentPerson); }
58: }
59:
60: public ICommand AddCommand
61: {
62: get { return new RelayCommand(AddPerson); }
63: }
64:
65: public void AddPerson()
66: {
67: Person newPerson = new Person { Name = this.Name, Age = this.Age };
68: model.People.Add(newPerson);
69: Current = newPerson;
70: }
71: }
So this ViewModel has a People property, which is the list we’re going to work with, a Current property to allow us to access the currently selected person (we’ll databind the selected item property of the list control to it), and a Name and Age property for entering new people. These properties will be data bound to two text boxes, so the user can enter stuff in the text boxes, but the command (which is on the viewmodel level) can access these properties, again not knowing which controls are being used.
NOTE: the RaisePropertyChanged is not implemented here without the PersonVM.Properties.Property technique. That is because for this demo I also created a code snippet to make it easier to type in properties that implement INotifyPropertyChanged. It’s very easy to create your own, I’ve actually uploaded a little video on how to do this.
The View
If you’d ask me what is the best thing in WPF, then I would say DataTemplate! Our UI is going to databind to the ViewModel and we’re going to associate the View using a DataTemplate. WPF will automatically select our view when it databinds to our ViewModel. You can do this as follows:
1: <Window x:Class="ModelViewViewModelLab.Window1"
2: xmlns="http://schemas.microsoft.com/winfx/2006/xaml/presentation"
3: xmlns:x="http://schemas.microsoft.com/winfx/2006/xaml"
4: xmlns:viewModels="clr-namespace:ModelViewViewModelLab.ViewModels"
5: xmlns:views="clr-namespace:ModelViewViewModelLab.Views"
6: Title="Window1" Height="300" Width="300">
7: <Window.Resources>
8: <!-- voor elk soort van viewmodel mappen we dit naar een view -->
9: <DataTemplate DataType="{x:Type viewModels:PersonVM }">
10: <views:PersonView />
11: </DataTemplate>
12: </Window.Resources>
13: <Grid>
14: <ContentControl Content="{Binding}" />
15: </Grid>
16: </Window>
This way the view will be created with its DataContext set to the view model, so we can use DataContext relative data binding:
1: <UserControl x:Class="ModelViewViewModelLab.Views.PersonView"
2: xmlns="http://schemas.microsoft.com/winfx/2006/xaml/presentation"
3: xmlns:x="http://schemas.microsoft.com/winfx/2006/xaml"
4: xmlns:model="clr-namespace:ModelViewViewModelLab.Models"
5: Height="300" Width="300">
6: <UserControl.Resources>
7: <DataTemplate DataType="{x:Type model:Person}">
8: <StackPanel Orientation="Vertical">
9: <StackPanel Orientation="Horizontal">
10: <TextBox Text="{Binding Name}" />
11: <TextBlock Text=" - " />
12: <TextBox Text="{Binding Age}" />
13: </StackPanel>
14: <ProgressBar Width="100" Height="16" Value="{Binding Age}" />
15: </StackPanel>
16: </DataTemplate>
17: </UserControl.Resources>
18: <Grid>
19: <Grid.ColumnDefinitions>
20: <ColumnDefinition />
21: <ColumnDefinition />
22: </Grid.ColumnDefinitions>
23: <!-- People listbox -->
24: <ListBox ItemsSource="{Binding People}"
25: Name="theList"
26: SelectedItem="{Binding Current}" />
27: <!-- Command part -->
28: <StackPanel Orientation="Vertical" Grid.Column="1">
29: <ContentControl Content="{Binding Current}" />
30: <!-- New person -->
31: <TextBox Text="{Binding Name}" />
32: <TextBox Text="{Binding Age}" />
33: <Button Content="Add" Command="{Binding AddCommand, Mode=OneWay}" />
34: <Button Content="Delete" Command="{Binding DeleteCommand, Mode=OneWay}"/>
35: </StackPanel>
36: </Grid>
37: </UserControl>
Note the buttons in the view; these are data bound to the RelayCommand instances on the view model. Clicking these will execute the associated command.
1: public class RelayCommand : ICommand
2: {
3: Action action;
4:
5: public RelayCommand(Action execute)
6: {
7: action = execute;
8: }
9:
10: public bool CanExecute(object parameter)
11: {
12: return true;
13: }
14:
15: public event EventHandler CanExecuteChanged;
16:
17: public void Execute(object parameter)
18: {
19: action();
20: }
21: }
The Commands
RelayCommand is a (too) simple implementation of the command pattern in WPF, but it allows us to easily execute a method on the model or viewModel. Our viewModel uses it to expose two commands: add and delete:
1: public ICommand DeleteCommand
2: {
3: get { return new RelayCommand(DeleteCurrentPerson); }
4: }
5:
6: public ICommand AddCommand
7: {
8: get { return new RelayCommand(AddPerson); }
9: }
Thanks to delegates this is easy!
The commands each execute a method on the viewModel:
1: public void AddPerson()
2: {
3: Person newPerson = new Person { Name = this.Name, Age = this.Age };
4: model.People.Add(newPerson);
5: Current = newPerson;
6: }
AddPerson requires a couple of inputs, the name and age of the new person to add; its gets these from the Name and Age properties on the ViewModel. How did these get filled in? The view has a Textbox data bound to each!
1: public void DeleteCurrentPerson()
2: {
3: model.People.Remove(Current);
4: Current = model.People[0];
5: }
DeleteCurrentPerson will remove the currently selected person from the list of people. Again the Current property is data bound to the selectedItem property of the listbox, so when you select something from the listbox, the current property will be automatically updated. After deleting the current person, we select the first person from the list. Carefull, this will give a nice bug when the last person is removed from the list, but fixing this should be easy…
So, MVVM. That’s it. Of course you could add a lot using other patterns, but that is for another time…