This article describes a reusable way of implementing print support in a Windows 8 MVVM-and-XAML based Store app. I noticed on the MSDN forum that many developers have a problem with the XAML version of the official printing sample app. They find it too complex. So I originally wanted to create a simpler version of it. I realized very rapidly that these developers are actually wrong. The print sample is not too complex. On the contrary: the printing sample is missing many features that would make it useful in a production app:
• It does not support multiple types of print pages.
• The printed page only has flat text and images.
• The printed page does not support data binding.
• The printed page contains a mix of content (text) and template (header, footer, margins) elements - the template elements are not nicely encapsulated.
• The printed pages have no page number.
So I put that sample on steroids to address these issues and make it work in a larger MVVM context, and here’s the result. O, I also simplified it a bit: I removed the need for having two different print page classes: I merged HeaderPage and ContinuationPage into a single PrintPage (see comments below). Let me tell you upfront: the code works, but I’m not proud of it. I sincerely hope that I missed a useful XAML feature or two, because the overall complexity level is just too high for something as basic as printing. I have a hunch that I did boldly go where nobody should have gone before.
Here’s how my sample app looks like. It has a main page with two buttons that talk to the print provider, and a ComboBox that’s populated by a ViewModel:
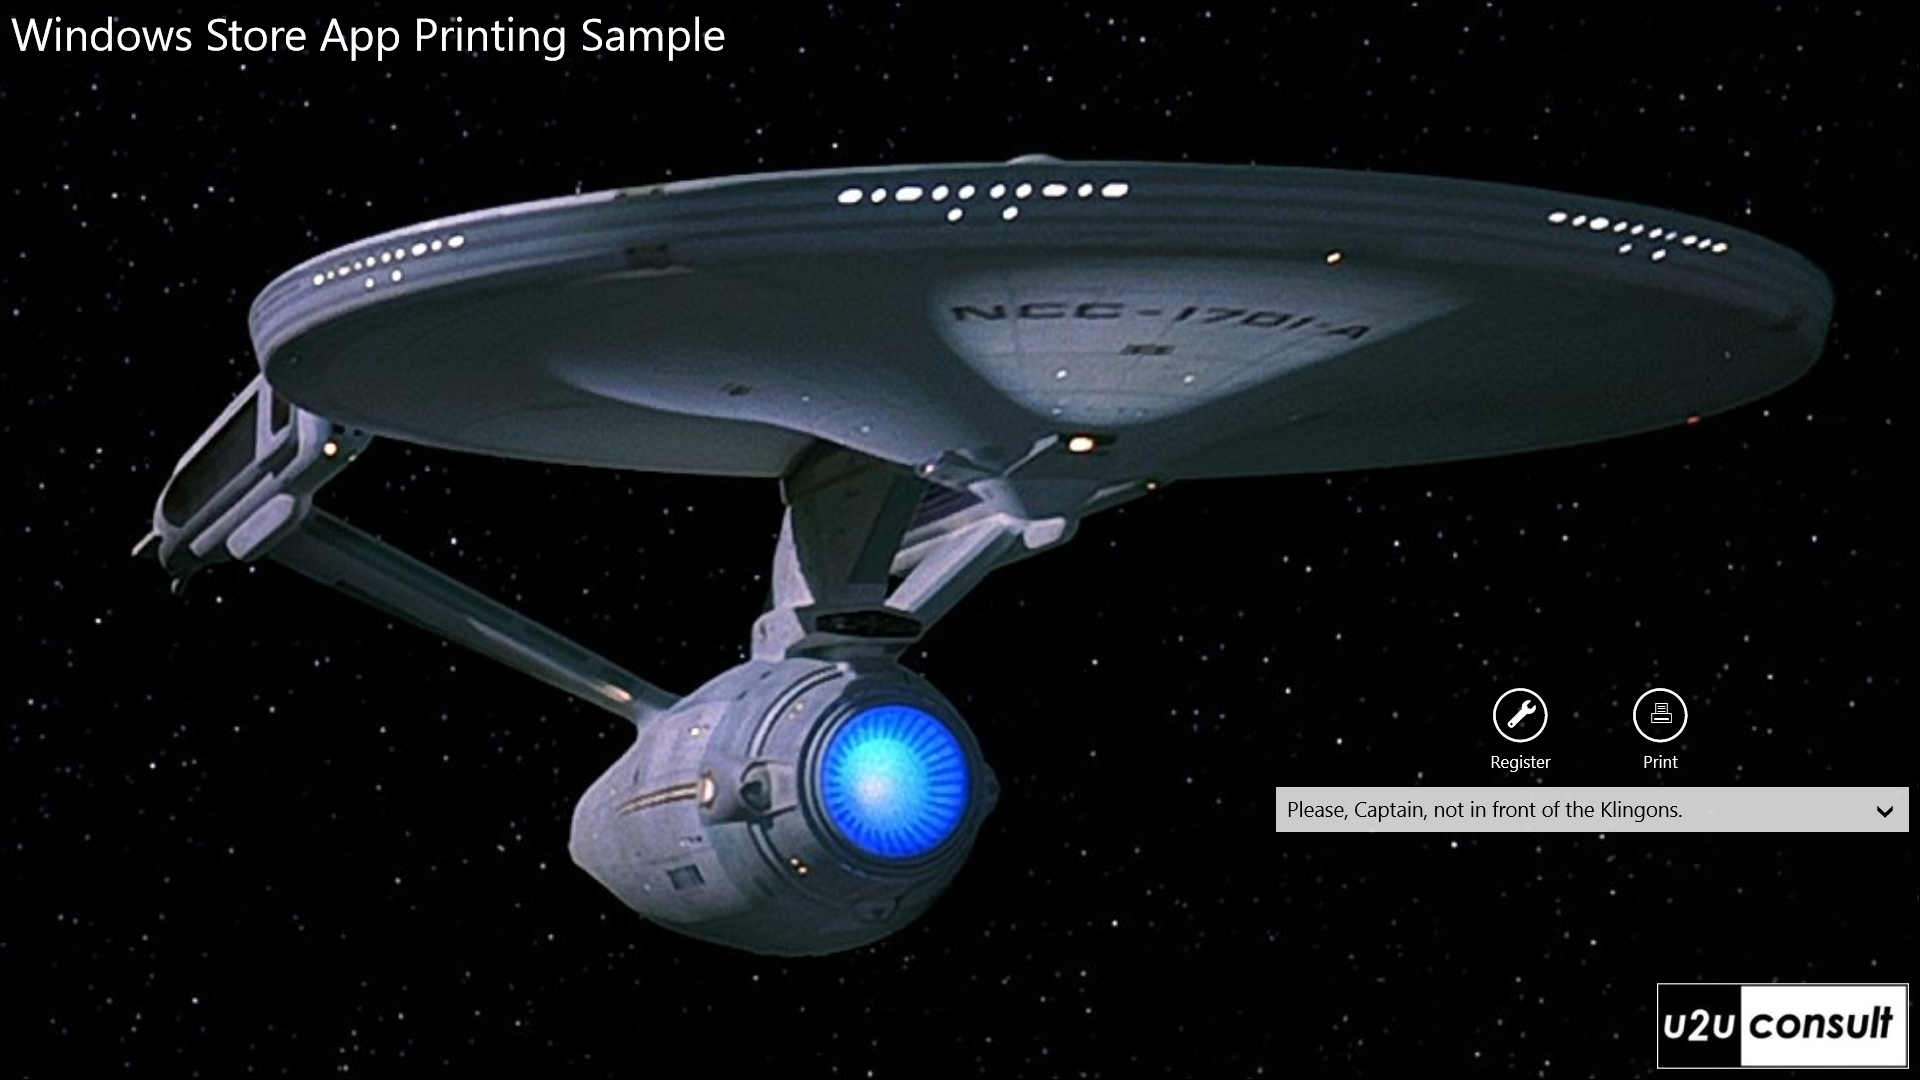
That's a simple start. Now hear the rest of the story.
The Framework
This is the object model of the lightweight printing framework:
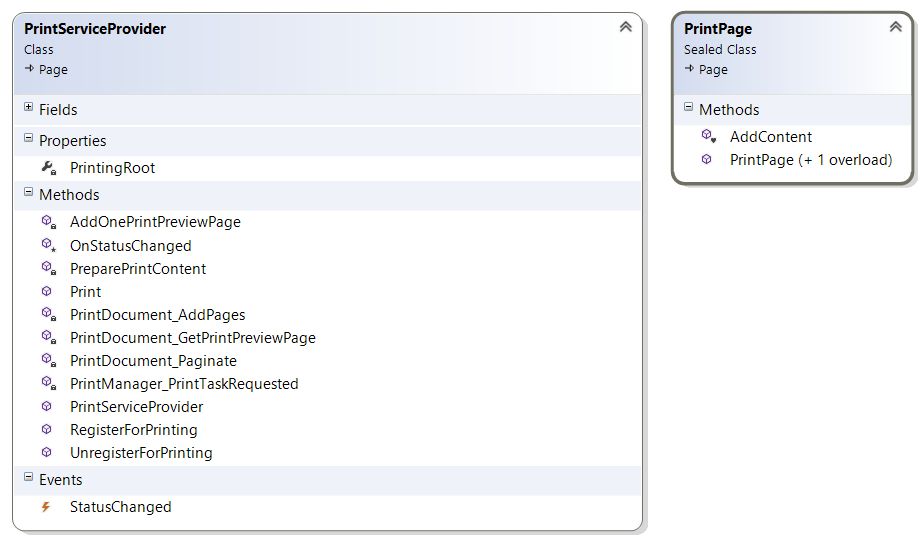
Most of the reusable functionality is encapsulated in the PrintServiceProvider. It has methods to register and unregister the app for printing with Windows. If you don’t register, then the devices charm remains empty. It also has the required event handlers that are called by Windows to generate the pages to be displayed in the preview pane and the actual pages to be printed. Just like in the official printing sample, the class inherits from Page. That allows it to make use of its Dispatcher.
The printing framework also comes a ‘real’ page: the PrintPage instances appear in the preview pane and are sent to the device. It's just an empty page with a header, a footer, and a RichTextBlockOverflow. That overflow is crucial to the framework, because the biggest problem when printing XAML is pagination. On top of the print page there's a RichTextBlock that receives all print content, but it's invisible itself. It lives in a Grid Row with Height 0, so all print content -except a dummy first paragraph- will be sent to the overflows.
The responsibilities of these core classes in the framework are based on the original printing sample and further elaborated in this excellent article from the popular 31 days of Windows 8 series.
The last class in the framework is an EventArgs class that carries a message to the subscribers of the StatusChanged event.
The Caller
Although the framework is reusable, there are some constraints on the caller. Any page in a Store app that wants to be printed should have a printable version of it. Typically a page on paper will look different from its version on screen (starting with size and orientation). The print page only contains a RichTextBlock with paragraphs. Some of these contain just text, but most of these will host an InlineUIContainer which can contain anything – including a databound control. You should prefer a Grid inside the inlines to layout the content, other controls -like StackPanel- will be truncated. This is how a print page looks like:
<Page>
    <RichTextBlock>
        <Paragraph>Some Text</Paragraph>
        <Paragraph />
        <Paragraph>
            <InlineUIContainer>
                <!-- Any (data bound) Control-->
            </InlineUIContainer>
        </Paragraph>
        <!-- ... -->
    </RichTextBlock>
</Page>
Since the PrintServiceProvider needs to make use of real screen infrastructure to physically measure the elements, we require each printable page to come with an (invisible) Canvas in its visual tree. That canvas should be called ‘printingRoot’. Alternatively, the printing framework itself could inject this element into the page. Here’s how the PrintingRoot of the main page in the sample app looks like:
<Grid>
    <Canvas x:Name="printingRoot"
            Opacity="0" />
    <!-- Real content -->
    <!-- ... -->
</Grid>
The process
When you navigate to a page in an app that supports printing, you call the RegisterForPrinting method of the PrintServiceProvider. This can be done in the OnNavigatedTo, or from a Button (like in the sample). The Visual Studio templates deliberately don’t have a PrintAppBarButtonStyle, and the Segoe Symbol UI font does not come with a print icon. That's because Micrsosoft wants you to use the Device Charm to start printing. I agree with that, but just in case, here’s a print button style:
<Style x:Key="PrintAppBarButtonStyle"
        TargetType="ButtonBase"
        BasedOn="{StaticResource AppBarButtonStyle}">
    <Setter Property="AutomationProperties.AutomationId"
            Value="PrintAppBarButton" />
    <Setter Property="AutomationProperties.Name"
            Value="Print" />
    <Setter Property="FontFamily"
            Value="Wingdings 2" />
    <Setter Property="Content"
            Value="x36;" />
</Style>
I used a button event handler instead of a command binding to the ViewModel. In most apps, printing is a GUI responsibility, so I don't feel guilty about the code behind. When registering, the page should provide a reference to itself (to find the PrintingRoot), and it should provide the type of print page as well as the viewModel or Model that will be bound to the print pages, like this:
this.printServiceProvider.RegisterForPrinting(this, typeof(MainPrintPage), this.DataContext);
The PrintServiceProvider first checks the presence of a PrintingRoot, then prepares the print output, and finally hooks event handlers to the events that will be raised by Windows to create the preview pages and to start printing, as explained in the Printing Quickstart.
The beef of the code is in the PreparePrintContent method. Here’s a detailed overview of what’s happening over there.
First it creates an instance of the print page, and applies the (view-) model to it:
var printPage = Activator.CreateInstance(this.printPageType) as Page;
printPage.DataContext = this.DataContext;
The forst page is created, and an empty paragraph is injected into an invisible RichTextBlock. That makes sure that all ‘real’ print content will overflow to the RichTextBlockOverflow:
firstPage = new PrintPage();
firstPage.AddContent(new Paragraph());
Then we loop over all paragraphs in the print page. We remove each paragraph, and hook it in the PrintingRoot to be measured. The actual height of the element will be used as LineHeight of the paragraph, because that’s the property that defines whether or not the element still fits on the current page. Then the paragraph is added to the first page.
// Move content from print page to print template - paragraph by paragraph.
var printPageRtb = printPage.Content as RichTextBlock;
while (printPageRtb.Blocks.Count > 0)
{
    var paragraph = printPageRtb.Blocks.First() as Paragraph;
    printPageRtb.Blocks.Remove(paragraph);

    var container = paragraph.Inlines[0] as InlineUIContainer;
    if (container != null)
    {
        // Place the paragraph in a new textblock, and measure it.
        var measureRtb = new RichTextBlock();
        measureRtb.Blocks.Add(paragraph);
        PrintingRoot.Children.Clear();
        PrintingRoot.Children.Add(measureRtb);
        PrintingRoot.InvalidateMeasure();
        PrintingRoot.UpdateLayout();
        measureRtb.Blocks.Remove(paragraph);

        // Apply line height to trigger overflow.
        paragraph.LineHeight = measureRtb.ActualHeight;
    }

    firstPage.AddContent(paragraph);
};
Update: a Performance Analysis session on a remote Surface RT machine revealed that ARM devices have a big problem with the following line of code in the previous script:
measureRtb.Blocks.Remove(paragraph);
You should replace it by this:
measureRtb.Blocks.Clear();
End of Update.
When the user opens the print charm -by swiping on the right or by pressing the button- the printers are added to the list of devices in the devices charm. When the user taps on a device, the OS asks the app to generate its print (preview) pages. This is done by the PrintDocument_Paginate method. It produces output pages by adding these one by one to the collection as long as there’s content that overflows to the next page.
while (lastRTBOOnPage.HasOverflowContent && lastRTBOOnPage.Visibility == Windows.UI.Xaml.Visibility.Visible)
{
    lastRTBOOnPage = AddOnePrintPreviewPage(lastRTBOOnPage, pageDescription);
}
The core logic of the loop is in the AddOnePrintPreview method. It applies a physical size to the print content by assigning a margin, and then sends it to the PrintingRoot to be measured. This triggers the overflow mechanism. Elements that don’t fit the page, are routed to the next one.
// Set paper width
page.Width = printPageDescription.PageSize.Width;
page.Height = printPageDescription.PageSize.Height;

Grid printableArea = (Grid)page.FindName("printableArea");

// Get the margins size
// If the ImageableRect is smaller than the app provided margins use the ImageableRect
double marginWidth = Math.Max(printPageDescription.PageSize.Width - printPageDescription.ImageableRect.Width, printPageDescription.PageSize.Width * HorizontalPrintMargin * 2);
double marginHeight = Math.Max(printPageDescription.PageSize.Height - printPageDescription.ImageableRect.Height, printPageDescription.PageSize.Height * VerticalPrintMargin * 2);

// Set-up "printable area" on the "paper"
printableArea.Width = page.Width - marginWidth;
printableArea.Height = page.Height - marginHeight;

// Add the (newly created) page to the printing root which is part of the visual tree and force it to go
// through layout so that the linked containers correctly distribute the content inside them.
PrintingRoot.Children.Add(page);
PrintingRoot.InvalidateMeasure();
PrintingRoot.UpdateLayout();

// Find the last text container and see if the content is overflowing
textLink = (RichTextBlockOverflow)page.FindName("continuationPageLinkedContainer");
This routine also adds a page number to each page:
this.pageNumber += 1;
TextBlock pageNumberTextBlock = (TextBlock)page.FindName("pageNumber");
if (pageNumberTextBlock != null)
{
    pageNumberTextBlock.Text = string.Format("- {0} -", this.pageNumber);
}
Example
Here’s an example of the framework in action. I created a ListBox bound to a list from the ViewModel. It renders nice, even in a more advanced version with a data template and a converter:
<!-- Databound content with data template and converter -->
<Paragraph>
    <InlineUIContainer>
        <Border BorderBrush="Green"
                BorderThickness="2"
                Margin="0 4">
            <ListBox ItemsSource="{Binding TrekkieQuotes}">
                <ListBox.Resources>
                    <local:StringFormatConverter x:Key="sfc" />
                </ListBox.Resources>
                <ListBox.ItemTemplate>
                    <DataTemplate>
                        <TextBlock Text="{Binding Converter={StaticResource sfc}, ConverterParameter='* {0}'}"
                                    Margin="0" />
                    </DataTemplate>
                </ListBox.ItemTemplate>
            </ListBox>
        </Border>
    </InlineUIContainer>
</Paragraph>
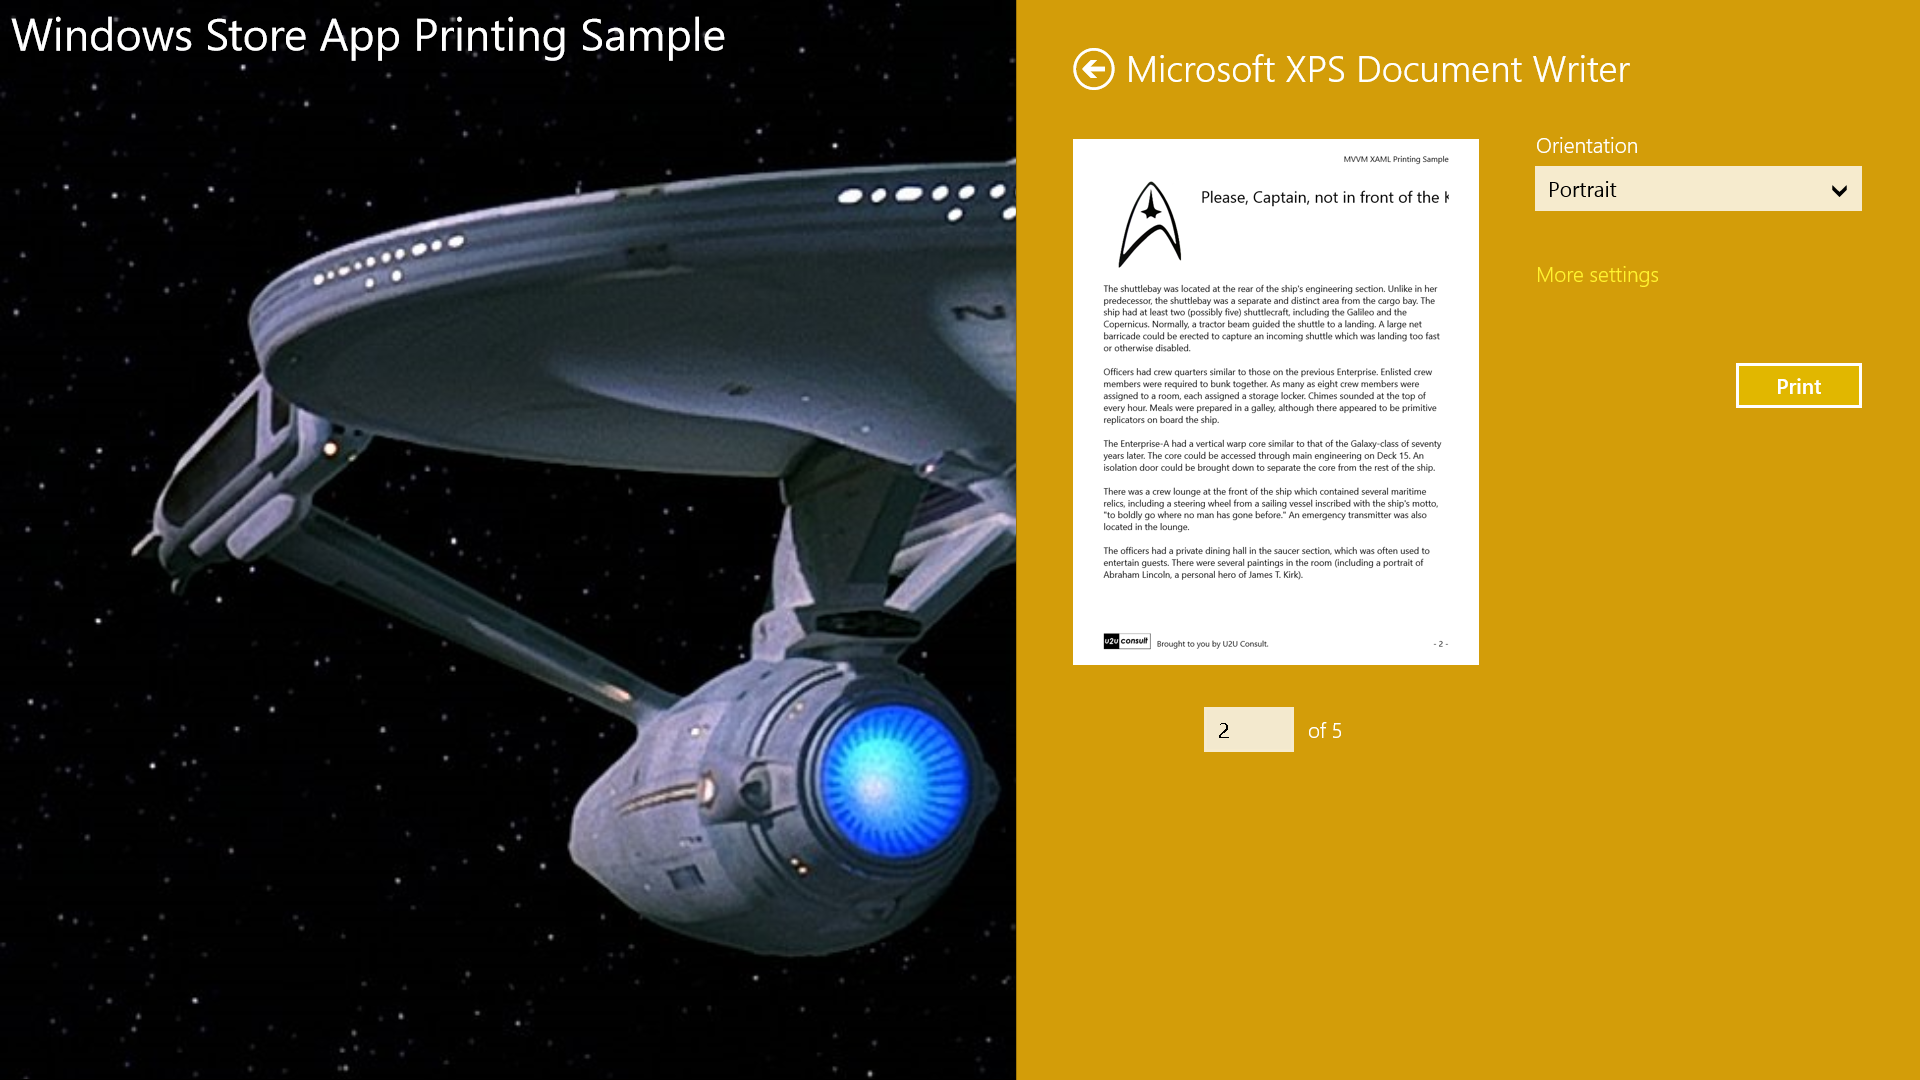
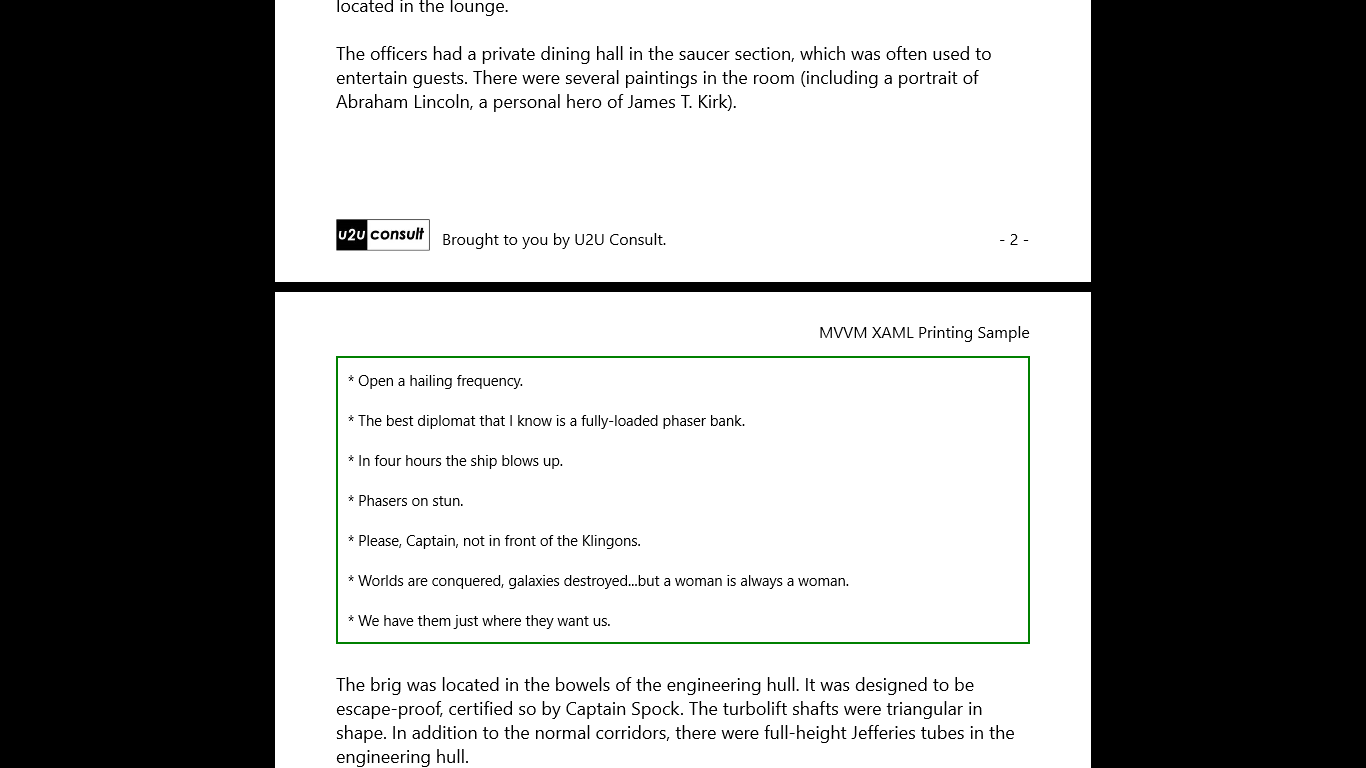
Here you see at the bottom of the print preview page that the ListBox is overflown to the next one, and the resulting XPS document:

Strange new worlds, still to explore
I know that there are still a couple of issues with this code. If a single inline element is higher than the printed page, then it’s not rendered and you end up with an empty page. A future version of the PrintServiceProvider should e.g. wrap it in a Grid. In the current version, the measurement is done very early in the workflow: when registering. So when the user, before he prints, changes a bound value that has an impact on the height of the element, then the new height is probably ignored. I've written the code this way, because calls to the PreparePrintContent in the event handlers (e.g. during pagination) were causing cross-threading issues (probably caused by the fact that the print service provider is actually a DependencyObject since it inherits from Page).
The current version however seems to cover all printing needs for the Store apps I’m currently working on. That's good enough. After all, I just lost two weeks to do something that I expected to deliver in two hours. Anyway, I promise to update the code here whenever I have a new version.
Code
Here’s the code, it was written with Visual Studio 2012 Express (well, except for the class diagram): U2UConsult.Win8.PrintingSample.v2.zip (170.55 kb)
Enjoy and ... live long and prosper,
Diederik