Developing a list definition for a custom list using the Visual Studio 2008 extensions for WSS is not that hard because there is an existing project template for it. But having the custom fields displayed in the several forms (edit form, new form, display form, etc) can be a challenge. This post offers you a walkthrough on how you can proceed.
Lets say you want to develop a list definition for a custom list having fields like CustomerCode, Name, City, Country and StartDate. The custom list must also contain a customer ID but as the list item will inherit from the standard list item, the ID column will automatically be created. The Name column will be the standard Title column. When a new customer is entered, you also want to check if the customer code is not already used for another customer, so you will need to add an event receiver to the custom list.
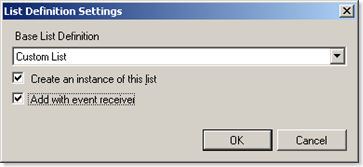
Open Visual Studio 2008 and choose to create an empty SharePoint project. Add a new list item of type SharePoint List Definition. In the dialog that appears, select Custom List and check both the check boxes.
This is the structure that is created by the Visual Studio extensions for WSS. Notice that the necessary forms like the AllItems.aspx, DispForm.aspx, etc are all there. They will need no modification. The schema.xml file contains the definition of the list template and it is in here that you will have to do the work. The instance.xml file will create a list instance based on this custom list definition upon activation of the feature. The ItemEventReceiver.cs file will contain the necessary code for checking the existence of the customer code. The ItemEventReceiver.xml file on its turn will install the event receiver upon activation of the feature.
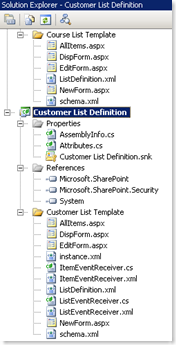
As we want to develop an item event receiver, we can remove the ListEventReceiver.cs and the ListEventReceiver.xml file from the project.
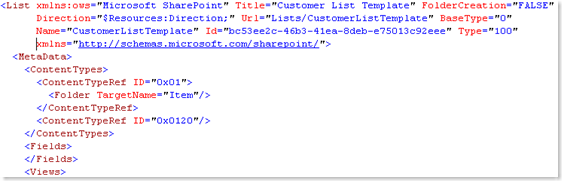
First we are going to define the schema of the Customer list. Open the schema.xml file and locate the <Fields> node.
Enter a field element for each column in the custom list. If you copy/paste, don't forget to change the GUID of the field ID because the ID must be unique.
<Field ID="{7809EF2B-C225-4459-BC81-50F9CBF1A244}" DisplayName="Code"
Type="Text" Required="TRUE" MaxLength="15" StaticName="Code"
Name="Code" RowOrdinal="0"
SourceID="http://schemas.microsoft.com/sharepoint/v3" />
This Field element should be added for each column needed in the custom list. Also pay attention to attributes like
- Name: this is the internal name of the field. This field doesn't allow spaces. In the case of Company Name you can use CompanyName or Company_x0020_Name.
- DisplayName: this is the user friendly name of the field and allows spaces.
- StaticName: give it the same value as the Name attribute.
- Type: this indicates the data type of the field. Possible values are the SharePoint data types like Text, Note, DateTime, Currency, Number,...
- Required: indicates wether a value is required or not.
At the top of the schema definition you find a ContentTypes element containing one or more ContentTypeRef elements. Remove these elements and add a new ContentType element. This is the definition of the Customer content type.
The ID attribute shows the inheritance: this content type inherits from the Item content type which has ID 0x01. The ID should then be followed by 00 and a new GUID.
It is necessary to define a content type to make the fields appear in the New, Edit and Display form.
| <ContentTypes>
<ContentType
ID="0x0100247971ABF81E4ac9B96C7C6287D18772"
Name="Customer Item"
Group="U2U Content Types"
Description="Customer item content type."
Version="0"> <FieldRefs> <!-- Here comes the reference to the fields -->
</FieldRefs> </ContentType> </ContentTypes> |
The FieldRefs element of the content type contains the field references to the fields you defined in the Fields element. The first field is the reference to the Title field which is part of the Item content type.
| <FieldRefs>
<FieldRef ID="{fa564e0f-0c70-4ab9-b863-0177e6ddd247}" Name="Title" Required="TRUE" DisplayName="Company Name" /> <FieldRef
ID="{7809EF2B-C225-4459-BC81-50F9CBF1A244}"
Name="Code"
Required="TRUE"
ShowInNewForm="TRUE"
ShowInEditForm="TRUE"/> <FieldRef
ID="{F5BC3F73-88E0-436e-8C2C-C9819FFE2FE3}"
Name="City"
Required="FALSE"
ShowInNewForm="TRUE"
ShowInEditForm="TRUE"/> <FieldRef
ID="{D5877137-AB9C-4474-93BD-F99B734436D8}"
Name="Country"
Required="FALSE"
ShowInNewForm="TRUE"
ShowInEditForm="TRUE"/> <FieldRef
ID="{242BF2C4-6459-45f2-B61C-EF7280A701C6}"
Name="StartDate"
Required="FALSE"
ShowInNewForm="TRUE"
ShowInEditForm="TRUE"/>
</FieldRefs> |
The content type also contains a XmlDocuments element which is a collection of XmlDocument elements. An XmlDocument element can contain custom information. In this case it defines the form templates to use when displaying the content type.
Then you have a number of View definitions. To have your fields displayed in the different views, for example the All Items view when viewing the list content, you have to add your custom fields to the ViewFields element of each view.
| <ViewFields>
<FieldRef Name="LinkTitleNoMenu">
</FieldRef>
<FieldRef Name="Code" />
<FieldRef Name="City" />
<FieldRef Name="Country" />
<FieldRef Name="StartDate" />
</ViewFields> |
Now that the list definition is set and done, we can start with the code for the event receiver. When a new customer is entered, you want to check whether the customer code is already used for another customer or not. Open the ItemEventReceiver.cs file and uncomment the ItemAdding event handler:
| public override void ItemAdding(SPItemEventProperties properties)
{
// Check here if the code already exists
DisableEventFiring(); string code = null;
if (properties.AfterProperties["Code"] != null)
{
code = properties.AfterProperties["Code"].ToString();
} SPList list = properties.OpenWeb().Lists[properties.ListId]; if (!ValidateData(list, code))
{
properties.Cancel = true;
properties.ErrorMessage = "This customer code is already in use.";
} EnableEventFiring();
} |
The ValidateData method is a private method that executes a CAML Query to check whether the customer code already exists or not.
| private bool ValidateData(SPList list, string email)
{
if (email != null)
{
SPQuery qry = new SPQuery();
qry.Query = "<Where><Eq><FieldRef Name='Code' /><Value Type='Text'>"
+ email + "</Value></Eq></Where>";
SPListItemCollection results = list.GetItems(qry);
if (results.Count > 0)
return false;
}
return true;
} |
Time to deploy the list definition. The ListDefinition.xml file contains the definition of the list template. Open the file to modify some metadata. You can change the display name of the list template and set the type to a custom number.
| <ListTemplate Name="CustomerListTemplate"
DisplayName="Customer List Template"
Description=""
BaseType="0"
Type="700"
OnQuickLaunch="TRUE"
SecurityBits="11"
Sequence="410"
Image="/_layouts/images/itgen.gif" /> |
The instance.xml file defines the list instance that will be created based on your custom list template. Also here you can change f.e. the Title attribute.
| <ListInstance FeatureId="bc53ee2c-46b3-41ea-8deb-e75013c92eee"
Title="Customer List Template instance"
Url="Lists/CustomerListTemplate">
</ListInstance> |
Open the project Properties and set the Start browser with URL on the Debug tab to your SharePoint site where you want to deploy your custom list template. Press F5 to start the deploy.
Open an internet browser and navigate to your SharePoint site. The list instance is already created for you. Add a new customer and fill out some data.

Add another customer with the same code and you will get an error message indicating that this customer code is already used.
You can download the code here.