While my world stopped turning 10 days ago, technology has not. The coming weeks I will post things I stopped working on because my work for Patrick took too much of my (free) time. By keeping up the work I hope to honor him. Thanks for the many words of support and the condolences.
When integrating Silverlight applications with SharePoint custom development, you have different possibilities where to deploy your silverlight application:
- To the ClientBin folder of your IIS web application: If you deploy in this location, it means that the Silverlight application can be picked up by any SharePoint code that runs in the site collections and sites hosted on the IIS Web Application.
- To the 12\Template\Layouts or in the 12\Template\ControlTemplates folder: deploying here means that you can include all of the deployment steps in your SharePoint Solution.
- To a document library: you can create one central document library within your site collection (or if you want a more narrow scope, for your site) where to drop the XAP files.
I refer to the post of Patrick Tisseghem for more details, advantages and disadvantages of each possibility.
In this post I will show you how you can deploy your Silverlight application as an embedded resource of your web part. In that case the Silverlight application will only be available to that web part.
The first step is to build your silverlight application. I used the Hello Silverlight 2.0 application from the Silverlight BluePrint for SharePoint.
Create your web part
Then create your web part. I used the SharePoint WebPart template for Visual Studio 2008.
Add a reference to the following DLLs:
- System.Web.Silverlight.dll (version 2.0.5.0)
- System.Web.Extensions.dll (version 3.5.0.0)
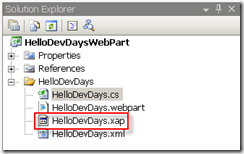
Add your silverlight application (.xap) to your Visual Studio project. I created a Resources directory for it. Set the properties of the xap to Embedded Resource. Don't forget this because otherwise the Silverlight application will not be compiled as embedded resource.
Open the Web Part class. Before the namespace declaration add the metadata attribute that enables an embedded resource in an assembly:
[assembly: WebResource("EmbeddedSilverlightWebPart.Resources.SL.XAML.HelloSilverlight20.xap", "application/x-silverlight-app")]
Check the correct namespace with Reflector.
Add a class level variable for the Silverlight control. This control resides in the System.Web.Silverlight namespace.
Silverlight silverlightControl;
Override the OnLoad event to check whether a Script Manager already lives on the Web Part page.
protected override void OnLoad(EventArgs e)
{
base.OnLoad(e);
// Script manager instance may appear only once on a page
ScriptManager scriptManager = ScriptManager.GetCurrent(this.Page);
if (scriptManager == null)
{
scriptManager = new ScriptManager();
this.Controls.AddAt(0, scriptManager);
}
}
Instantiate the Silverlight control in the CreateChildControls method and add it to the Controls collection. The Source property of the silverlight control need to be set to the location of the embedded resource. This location can be detected by using the this.Page.ClientScript.GetWebResourceUrl method:
protected override void CreateChildControls()
{
base.CreateChildControls();
this.Width = new Unit("400");
this.Height = new Unit("200");
string xapUrl = this.Page.ClientScript.GetWebResourceUrl(this.GetType(), "EmbeddedSilverlightWebPart.Resources.SL.XAML.HelloSilverlight20.xap");
silverlightControl = new System.Web.UI.SilverlightControls.Silverlight()
{
ID = "EmbeddedSlCtl",
MinimumVersion = "2.0.30523",
Source = xapUrl,
Width = new System.Web.UI.WebControls.Unit(400),
Height = new System.Web.UI.WebControls.Unit(200)
};
this.Controls.Add(silverlightControl);
}
Override the RenderContents method:
protected override void RenderContents(HtmlTextWriter writer)
{
EnsureChildControls();
if (silverlightControl != null)
silverlightControl.RenderControl(writer);
}
That's it. Build your code.
Deploy the web part
Make the necessary changes to the .webpart file and the .xml file if you want to. Patrick learned me to always add the web part to a significant group in the Web Part Gallery:
<Elements Id="1eba021c-8a0f-4bf2-8f2e-1c9d8f36bf7f" xmlns="http://schemas.microsoft.com/sharepoint/" >
<Module Name="WebParts" List="113" Url="_catalogs/wp">
<File Path="EmbeddedSilverlight.webpart" Url="EmbeddedSilverlight.webpart" Type="GhostableInLibrary">
<Property Name="Group" Value="Silverlight" />
</File>
</Module>
</Elements>
Deploy the web part to your SharePoint site. If you use the Visual Studio 2008 extensions for SharePoint, you only have to enter the URL of your SharePoint site in the project properties and press F5.
Don't forget to configure your SharePoint sites for enabling Silverlight if not yet done.
Add the Web Part to a Web Part page
You can download the sample web part here.
Thanks to Stefaan Rillaert for pointing me in the right direction.