In this blog post I will explain how you can call the SharePoint API from within Microsoft Flow, without having to fall back to Azure Functions, custom connector, premium connectors, ... just pure Microsoft Flow.
I still remember Microsoft Flow in the beginning, when the SharePoint connector only had 4 actions, while now it already has more than 25 actions. But this is still just a fraction of what you want to do inside your flows. All those other things like: creating a sub site, accessing the SharePoint groups, ... is not possible (yet?). But there is a powerful REST API in SharePoint available, that allows you to do everything you've ever dreamed of (in SharePoint). And Microsoft Flow has an HTTP connector which allows you to call such APIs. The only problem with that API is ... it requires authentication, like an Access Token.
Using add-in-only policy to get an access token
Now, this got me thinking ... would it be possible to use the add-in authentication inside flow to get that access token. Obviously, I'm interested in the scenario of add-in-only policy, since I have no user to authenticate. I will consider Azure AD in a later blog post.
The Microsoft documentation explains how an add-in can make add-in only calls. In its essence, retrieving the access token falls back to a POST call against https://accounts.accesscontrol.windows.net/
The POST will look something like this:
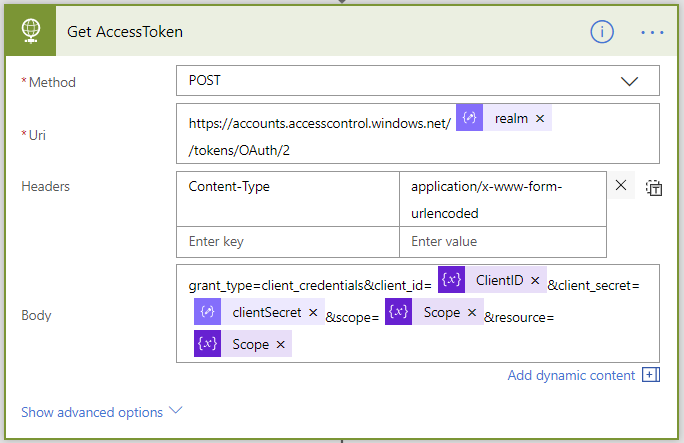
POST https://accounts.accesscontrol.windows.net/REALM/tokens/OAuth/2
Content-Type: application/x-www-form-urlencoded
grant_type=client_credentials&client_id=CLIENTID@REALM&client_secret=CLIENTSECRET=&scope=00000003-0000-0ff1-ce00-000000000000/TENANT.sharepoint.com@REALM&resource=00000003-0000-0ff1-ce00-000000000000/TENANT.sharepoint.com@REALM
We just need retrieve and fill in the missing parameters:
- REALM: Realm is a unique identifier assigned to your SharePoint tenant.
- CLIENTID: Identifier for your add-in, obtained during registration.
- CLIENTSECRET: Secret for your add-in, obtained during registration.
- TENANT: The name of your tenant.
Obtaining the Client ID and Secret
First you will have to register a client id and secret, you can do this at https://tenant.sharepoint.com/_layouts/AppRegNew.aspx, replacing tenant with your tenant name. Generate a new client id and secret, give it a name and fill in an app domain and redirect URI.

Store the client id and secret somewhere, you will need them later.
Granting permissions to your client id
Next, we need to grant permissions to our client id, you can do this on https://tenant-admin.sharepoint.com/_layouts/AppInv.aspx. Fill in your client id and do a lookup.

Provide the permission request xml, I'm asking for full control on the tenant, you could ask for less permissions if needed. Don't forget to click create and consent.
<AppPermissionRequests AllowAppOnlyPolicy="true" >
  <AppPermissionRequest Scope="http://sharepoint/content/tenant" Right="FullControl" />
</AppPermissionRequests>
Getting the Realm
The realm is a unique identifier assigned to your SharePoint tenant. You can find this for your tenant at https://tenant.sharepoint.com/_layouts/AppPrincipals.aspx

Creating the flow
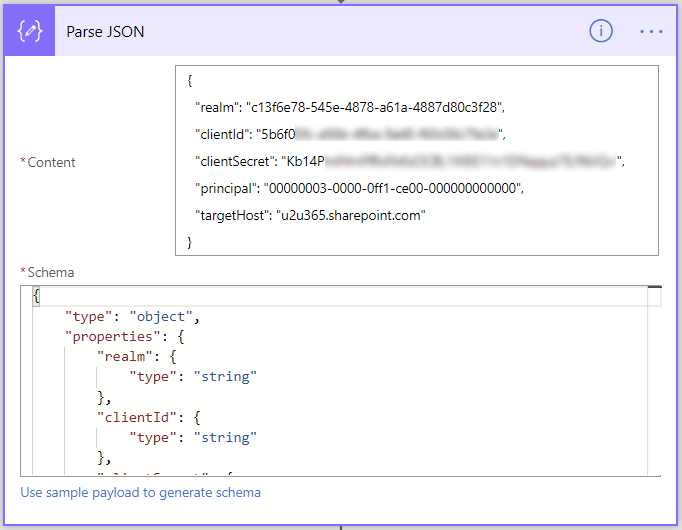
We now have all the blanks we needed and can start creating the flow. To be able to reuse the settings, I've put them inside a Parse JSON block. Fill in your own realm and target host.
Next we will construct the client id and scope that are used in the request, I'm putting these in a separate step since they include the @ symbol which is a special character for Microsoft Flow.
The client id is created with a Initialize variable and formula
concat(body('Parse_JSON')?['clientId'], '@', body('Parse_JSON')?['realm'])
The scope is created with a Initialize variable and formula
concat(body('Parse_JSON')?['principal'],'/',body('Parse_JSON')?['targetHost'],'@', body('Parse_JSON')?['realm'])
Now we can get the access token with an HTTP action
This will return us a response from which you can extract the access token using the Parse JSON and finally you can use your access token to call the SharePoint API!
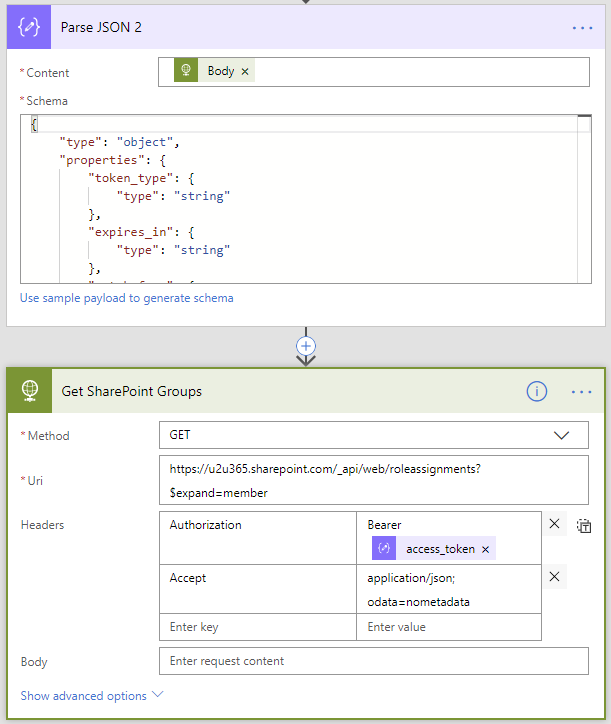
You can now start using the SharePoint API for all your GETs, for CREATE, PUT, PATCH, DELETE you will need to fetch a digest token as well.