Plotting data on maps is becoming popular: We can use the geometry and geography data type in SQL Server, use the Reporting Services maps, Excel PowerView allows mapping coordinates on a map, and the recently released PowerMap plug-in in Excel offers beautiful visualizations of map data.

But how can we easily get coordinates into these tools? Some tools connect with the Bing lookup service: you provide an address, Bing translates this into latitude-longitude coordinates. But sometimes we want to explicitly insert coordinates into the database. For instance, imagine you collecting location data with a smart phone or GPS device. Many of these devices store information in GPX or KML format. In this article, we discuss how we can load the waypoint coordinates from a GPX file into Excel. From there we can use it in Excel Power Map or Excel Power View reports, or we can use the SQL Server Import/Export wizard to import the Excel file into a SQL Server table, from which we can then use Reporting Services on this.
PowerQuery
PowerQuery is a free plugin for Excel 2010 and 2013. If you haven’t done so, download it from the Microsoft download site, and run the installer. Once installed, we can start loading different types of files into it, filter and manipulate the data, and in the end stored the result in either a regular Excel sheet, or in a PowerPivot model. Since GPX files are just XML files, we can load the file that way. GPX files can store coordinates in different ways. The two most popular are as a track (a bunch of points who make up a walk or route) or as waypoints: markers or points of interest. In the first example, we will load a local gpx file extracting the trackpoints. To save you all the trouble of repeating the transformation steps, I have included the M script. To rerun this:
- Start Excel
- In the PowerQuery ribbon select Get External Data –> From Other Sources –> Blank Query
- Go to the View ribbon, and select Advanced Editor
- Paste the query you see below into the query window, and replace the path of the gpx file with the actual path on your machine
- Click Done
- In the lower right corner, select the destination: If you plan on using PowerMap or PowerView on this data, select the Load to Data Model option
- In the Home ribbon select Apply and Close
let
    Source = Xml.Tables(File.Contents("c:\MyGPXFile.gpx")),
    #"Expand trk" = Table.ExpandTableColumn(Source, "trk", {"name", "desc", "number", "http://www.topografix.com/GPX/Private/TopoGrafix/0/1", "trkseg"}, {"trk.name", "trk.desc", "trk.number", "trk.http://www.topografix.com/GPX/Private/TopoGrafix/0/1", "trk.trkseg"}),
    #"Expand trk.trkseg" = Table.ExpandTableColumn(#"Expand trk", "trk.trkseg", {"trkpt"}, {"trk.trkseg.trkpt"}),
    #"Expand trk.trkseg.trkpt1" = Table.ExpandTableColumn(#"Expand trk.trkseg", "trk.trkseg.trkpt", {"Attribute:lat", "Attribute:lon"}, {"trk.trkseg.trkpt.Attribute:lat", "trk.trkseg.trkpt.Attribute:lon"}),
    RemovedOtherColumns = Table.SelectColumns(#"Expand trk.trkseg.trkpt1",{"trk.trkseg.trkpt.Attribute:lat", "trk.trkseg.trkpt.Attribute:lon"}),
    ChangedTypeWithLocale = Table.TransformColumnTypes(RemovedOtherColumns, {{"trk.trkseg.trkpt.Attribute:lat", type number}, {"trk.trkseg.trkpt.Attribute:lon", type number}}, "en-US")
in
    ChangedTypeWithLocale
If you want to load the waypoints instead of a track, you can repeat the same steps, except using this script:
let
    Source = Xml.Tables(Web.Contents("http://www.topografix.com/fells_loop.gpx")),
    ChangedType = Table.TransformColumnTypes(Source,{{"time", type datetime}, {"Attribute:version", type number}, {"Attribute:creator", type text}}),
    #"Expand wpt" = Table.ExpandTableColumn(ChangedType, "wpt", {"ele", "time", "Attribute:lat", "Attribute:lon"}, {"wpt.ele", "wpt.time", "wpt.Attribute:lat", "wpt.Attribute:lon"}),
    RemovedOtherColumns = Table.SelectColumns(#"Expand wpt",{"wpt.ele", "wpt.time", "wpt.Attribute:lat", "wpt.Attribute:lon"}),
    ChangedType1 = Table.TransformColumnTypes(RemovedOtherColumns,{{"wpt.time", type datetime}}),
    ChangedTypeWithLocale = Table.TransformColumnTypes(ChangedType1, {{"wpt.ele", type number}, {"wpt.Attribute:lat", type number}, {"wpt.Attribute:lon", type number}}, "en-US")
in
    ChangedTypeWithLocale
Notice that this last script loads the gpx file from the internet, replace Web.Content with File.Content if you want to load from a local file.
PowerMap
Once we have loaded the data in an Excel PowerPivot model, its easy to get it into a PowerMap. First, if you haven’t done so, download and install PowerMap. Open the Excel workbook in which you loaded the PowerQuery. We will use in the example the waypoints we loaded with the second example.
- Go to the Excel Insert ribbon, and click Map –> Launch Power Map
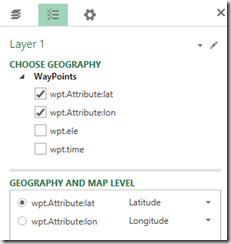
- The Power Map dialogue opens (you need to be connected to the internet, since it talks to Bing Maps) and prompts for the geographical information. Select the latitude and longitude fields, and specify explicitly which field is latitude and longitude:
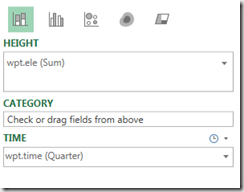
- Click Next. We now already see a map with the waypoints, but we can also plot extra information that is in the GPX file. For instance, we copied in this example also the time the waypoint was visited, and the elevation. So we can ask PowerMap to draw higher data bars for points with higher elevation, and we can put the time into the time axis:
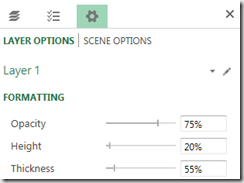
- Finally, by clicking the settings icon in the upper right corner we can make the data bars lower, less opaque and more narrow:
- This leads now to this visualization:
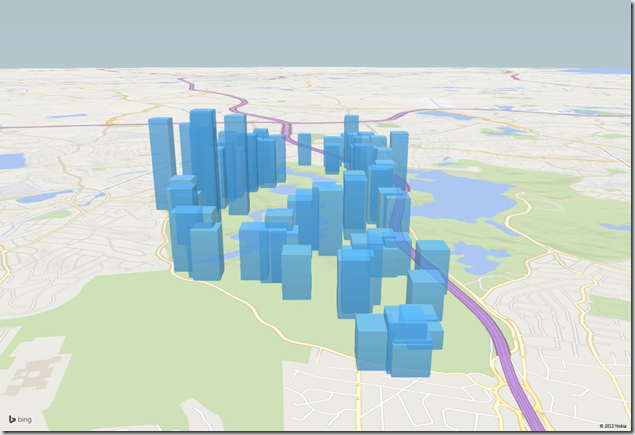
You can use this as a starting point to learn and experiment more with Power Map. Or use the model we made earlier on in Power View reports (from the Excel Insert ribbon as well).
I hope this gives you some inspiration to get started building your own visualizations on top of either GPS information you collect yourself, or information you find on internet or intranet. If you want to learn more on using these Excel data processing and reporting options (known as PowerBI), subscribe to one of our PowerBI classes.